Which metal stamping techniques cut total cost the most?

You face rising costs1 and tight launches. Delays hit profit, and waste grows fast. I share clear, low-risk stamping choices2.
Metal stamping cost falls when tooling matches volume, geometry, and tolerance. Teams compare progressive, compound, transfer, fourslide, and short-run routes1. Each route shifts die cost, press minutes, scrap, and secondary labor. Objective checks protect quality and delivery.
So you want simple rules and numbers that hold in production. I explain each route with DFM tips1, tables, and checklists2. Then you can align engineering, purchasing, and logistics in one short meeting.
Should I choose progressive die stamping for high volumes?
You fight price pressure1 on repeat programs. Launch windows feel short, and changes feel risky. So you need a scalable method2 that holds capability every day.
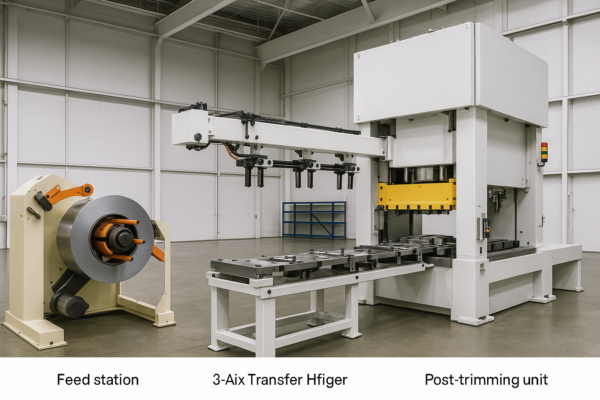
Progressive die stamping1 cuts piece price at high volume. The strip advances through stations, and each stroke adds features. The method shortens cycle time, reduces handling, and boosts repeatability. Teams also gain freedom with in-die piercing2, coining, tapping, and hardware insertion.

I link savings to four levers. First, one die runs many features, so changeovers drop hard. Second, line speed1 rises, so press minutes fall. Third, smart nesting2 shrinks scrap. Fourth, in-die taps and nuts remove bench work. And quality holds because the strip fixes location at every hit.
Progressive DFM rules that keep yield high
I design carriers that protect fragile edges1. I place holes away from bends, so distortion stays low. Then I round internal corners to stop cracks. Also, I set realistic burr and flatness targets2, so we avoid slow deburr passes.
Tolerance range and material guidance
I push progressive1 when demand exceeds 50k parts per year. I choose it for thickness from 0.2 to 3.0 mm. Then I hold ±0.05 mm2 on critical holes with stable coil steel. But I relax non-critical profiles to ±0.10 mm to protect speed.
| Cost Driver | Progressive Impact | Practical Note |
|---|---|---|
| Tool price1 | Medium to High | One die covers many ops, so unit cost drops with volume. |
| Scrap rate2 | Low to Medium | Smart strip layout reduces waste by 5–20%. |
| Cycle time | Low | High strokes per minute cut press cost. |
| Secondary ops | Very Low | In-die tapping and coining remove extra steps. |
Dive deeper: trade-offs, controls, and break-even math
I see progressive win1 when features spread along feed direction. However, deep forms can overload tonnage. So I balance station count with press energy and feed limits. Then I wire sensors for misfeeds, broken punches, torque, and hardware presence. I log every stop by lot, so traceability2 stays tight.
I share break-even math1 before we cut steel. I model tool cost, press minutes, scrap yield, and secondaries. Then I compare that model with short-run stamping2 numbers. I flip the route only when curves cross. And I flag risks around edge roll-over, burr direction, and springback. So your team sees savings and limits on one page.
Typical progressive capability by feature
| Feature Type | Reasonable Capability | Notes |
|---|---|---|
| Hole position1 | ±0.05 mm | With pilots and tight clearance punches |
| Outside profile | ±0.10 mm | Improves with post-trim station |
| Flatness after bend2 | ≤0.3 mm/100 mm | Depends on radius and grain |
| Burr height | ≤10% of thickness | Manage with punch-die clearance |
SEO terms included: custom stamping parts supplier, CNC parts precision machining, ISO-certified stamping manufacturer, China stamping factory.
Is compound die stamping the cheapest for precise flat parts?
You need tight holes and sharp profiles on thin flats. You want short lead time and clean concentricity1. But you cannot accept burr blowout on hard alloys2.
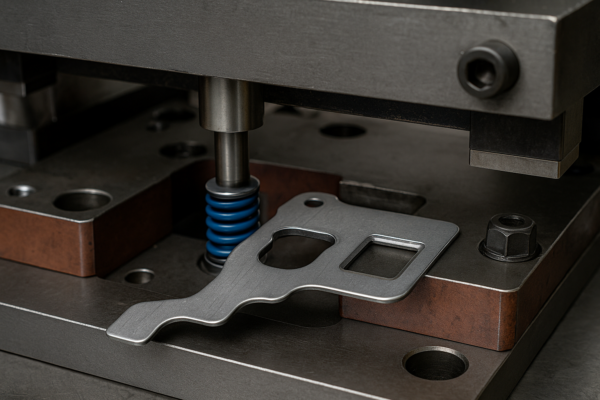
Compound dies punch the outside and the inside in one stroke. The process holds OD-to-ID location1 very well. Build time stays shorter than a full progressive die. The method suits washers, shims, gaskets, and thin electrical laminations2.
I choose compound dies for flat parts with critical concentricity1. So I hit tight OD-to-ID position without multi-station stack-up. Press time stays low because one stroke completes the part. Maintenance also stays simple because cams and lifters disappear. And I scale with multi-cavity inserts2 when demand grows.
DFM rules that protect yield
I set minimum web widths at 1.0× thickness or more. I keep hole-to-edge distance1 at 1.5× thickness. Then I specify radiused punch edges on hard alloys. Also, I set burr direction2 to match assembly flow, so operators load parts faster.
Tolerance, burr, and steel selection
I hold ±0.03–0.05 mm on concentricity1 with fine punches. I keep burr under 10% of thickness with the right clearance. Then I choose tool steel2 that resists galling on stainless. And I schedule quick sharpening windows, so parts stay within spec between runs.
| Decision Factor | Compound Benefit | Watchouts |
|---|---|---|
| Tool lead time1 | Short | Fewer stations save weeks on build. |
| Unit price | Low on thin flats | Less advantage on complex forms. |
| Precision2 | Excellent concentricity | Edge taper grows on thick stock. |
| Flexibility | Limited | Design changes may need new shoes. |
Dive deeper: when compound beats progressive on total landed cost
I prefer compound when the part stays flat and clamps well. I also prefer it when OD-ID location defines function. So the one-hit approach eliminates cumulative error1. Then gauging becomes simple and fast. I confirm clearance with coupon hits that prove burr height by alloy2.
I balance clearance and shear angle1 to protect the edge. Too tight, and galling rises. Too open, and burr grows. So I tune punches during T0 and T1. Then I adopt micro-bevels2 that reduce force without hurting edge quality. Finally, I design exit chutes that avoid tumble marks on cosmetic faces. This prevents useless re-polish time.
Compound process readiness checklist
- Approve OD-ID concentricity and thickness window.
- Freeze burr direction and target height.
- Lock punch-die clearance1 by alloy hardness.
- Validate exit path and cosmetic face protection.
- Set sharpening interval2 and spare punch count.
SEO terms included: ISO-certified stamping manufacturer, custom fasteners wholesale, ISO certified casting parts manufacturer.
Can fourslide (multislide) stamping lower cost for complex bends?
You handle small brackets with many bends. Scrap feels high, and bench forming1 feels slow. So you want one setup that forms everything fast with stable angles2.
Fourslide stamping1 forms multiple bends with sliding tools around the strip. The machine hits bends from several directions in one cycle. It reduces scrap2 on narrow parts and removes secondary forming. It suits clips, springs, terminals, and small enclosures.
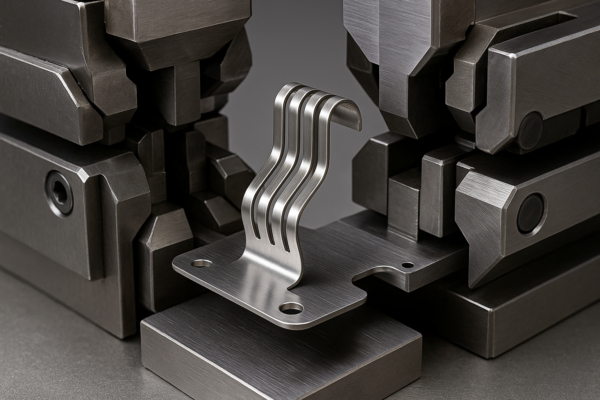
I like fourslide when the part is narrow and bend-dense1. We strip only what we need, so waste stays low. We remove outside cams because slides deliver the angles. Speed stays high, so unit price drops. And I tune bend radii2 on the fly, so trials finish sooner.
Geometry and hole strategy that stays stable
I keep bend radii1 at least one material thickness2. I add small reliefs where bends meet, so tears do not start. Then I move holes away from bends by two thicknesses. So holes stay round, and gauges pass in one touch.
Quality, packaging, and scale
I pair fourslide with inline vision for angle checks. I add first-off fixtures1 for fast approval. Then I specify returnable trays2, so delicate edges stay safe. Also, I plan family tools when parts share widths, so I reuse slides and reduce cost.
| Feature | Fourslide Advantage | Typical Range |
|---|---|---|
| Bend count | Many bends in one cycle | 3–8 bends common |
| Scrap rate1 | Very low on narrow parts | 5–12% typical |
| Setup time2 | Short with reusable slides | Hours, not days |
| Part size | Small to medium | Up to \~80 mm wide |
Dive deeper: angle capability, springback control, and packaging
I control springback with bend order, tool steel1, and dwell. I adjust wipe lengths to steer material flow2. Then I define a small design space for radii, reliefs, and hole offsets. Your engineer chooses safe values, not risky angles that kill rate.
I validate with simple gauge blocks1 and barcode-linked samples. Each hit stores angle, time, and coil lot. I review the trend daily during ramp. When drift appears, I tune wipe pressure2 and lube. I also sharpen forming edges before angles move out. This protects launch dates and customer trust.
Typical fourslide angle capability and controls
| Item | Target | Control |
|---|---|---|
| Bend angle | ±1.0° typical | Vision with SPC trending |
| Springback1 | Stable within ±0.5° | Dwell and wipe length tuning |
| Edge burr2 | ≤8% of thickness | Clearance and lube choice |
| Tray damage rate | <0.1% per lot | Rigid trays and edge guards |
SEO terms included: fourslide stamping supplier, custom stamping parts supplier, OEM plastic parts molding.
When does transfer die stamping beat progressive for larger parts?
You see big parts with deep forms and side actions. Progressive grows bulky, and cost explodes1. So you want a balanced path2 that keeps quality stable.
Transfer die stamping moves each blank station-to-station with mechanical fingers1. The route suits deep draws2, beads, flanges, and side-pierce features. Scrap drops because we buy blanks when outlines grow huge. Deep forms also become simpler across staged draws.
I pick transfer for large shells, covers, and deep cups. So I buy material as blanks and cut waste sharply. I space stations for draw beads and lube control. Then I hold wall thinning1 inside your limit with staged draws2. I offload final trim to lasers when it helps durability.
DFM rules that control draw risk
I set draw ratio targets1 by alloy and lube. I add generous radii that protect grain flow. Then I place beads that control metal movement. I also define trim steel as replaceable inserts2, so maintenance stays quick.
Tolerance, gauge, and cost math
I hold ±0.10–0.20 mm on large forms with calibrated gauges1. I pre-plan a T0 trial to tune lube and beads. Then I amortize tool cost across forecast, so unit price stays safe. I also add a backup press plan2 to protect launch.
| Decision Point | Transfer Advantage1 | Practical Cue2 |
|---|---|---|
| Blank size | Very large | Coil strip becomes wasteful. |
| Form depth | Deep draw stages | Staged cups protect thinning. |
| Side features | Side-pierce friendly | Add cams where needed. |
| Final trim | Laser-friendly | Keep the die robust and simple. |
Dive deeper: wall thinning, lube science, and tryout plan
I manage thinning with staged draws, radii, and bead placement. I map target thinning1 by zone and set SPC limits2. Then I select lube that matches alloy, speed, and temperature. I watch for pickup and orange peel while I track tonnage. When spikes appear, I polish radii, change lube, or split a stage.
I build a rigorous tryout plan. I define coupon tests, draw ratio steps, and forming limit checks. I shoot thermal images1 during runs to track heat and friction. Then I measure cups at three heights with CMM. I compare results with FEA, and I update the model. After that, I freeze bead geometry and radii. Mass production then starts with stable, documented controls.
Deep draw control map
| Control Area | What I Set | Why It Matters |
|---|---|---|
| Draw ratio1 | By alloy and thickness | Prevents splits and wrinkling |
| Bead geometry2 | Height, pitch, and position | Controls metal flow direction |
| Radii polish | Target Ra and lay | Reduces friction and pickup |
| Lube plan | Type, rate, and temp | Stabilizes force and surface |
SEO terms included: deep draw transfer stamping, ISO-certified stamping manufacturer, China stamping factory.
How do short-run methods cut tool cost for prototypes and bridges?
You test markets and need speed. Tooling must stay light, and risk must stay low. So you want real parts1 without slow, heavy dies2.
Short-run stamping uses soft tools, laser-cut blanks, turret punches, and modular form blocks. The methods create real parts fast with limited spend. They support PPAP samples1, fixtures, and early assembly trials. They help teams hit windows without locking weak geometry.
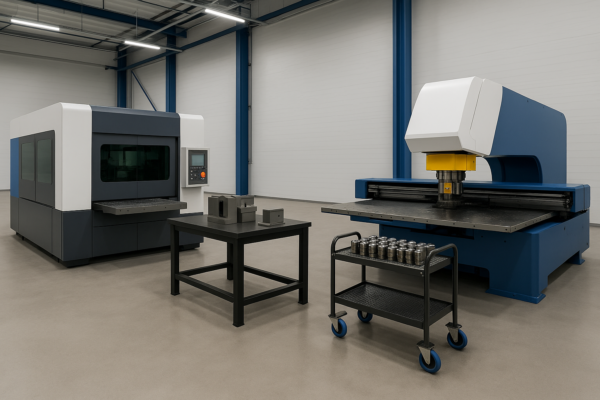
I combine laser blanking1 with modular form blocks. So I remove long die lead time from your plan. I use turret punches2 for hole patterns and cutouts. Then I add offline taps when volume stays low. I also build simple trim jigs when edge quality matters.
Where short-run saves the budget
I apply this path for volumes under 5k per build. I keep changeovers short with quick clamps1 and simple gauges. Then I tweak bends and clearances on the floor. And I capture gauge data2 fast to refine the drawing.
Cost, speed, and quality guardrails
I track unit price against final progressive math. I stop when the curve crosses the hard-tool break-even1. Then I mirror final pack specs2, so logistics learns early. Also, I share photos and data daily, so your team stays aligned.
| Method | Best Use | Break-Even Signal |
|---|---|---|
| Laser + form blocks1 | Complex outlines | Good until 3–8k parts |
| Turret punch + press brake2 | Many holes, few bends | Switch near 5–10k |
| Soft steel rule dies | Thin gaskets, films | Switch near 10k+ |
Dive deeper: staged sourcing that avoids rework and cash traps
I run sourcing in stages that match risk. Stage one uses laser blanks1 and press brake bends. This proves fit and basic angles. Stage two adds modular form blocks that mimic tight radii. This proves springback and hole stability. Stage three moves to pre-production dies2 with selected in-die actions. This proves rate, sensors, and packaging. Each stage has a clear exit, a budget, and a deliverable.
I show the break-even curve1 at every gate. The curve includes material yield, press minutes, deburr, and pack labor. I also include risk costs2 like rework and late freight. When the short-run line crosses the progressive curve, we switch. If demand falls, we stay lean and avoid sunk cost. Because I run this with you, cash and time stay safe.
SEO terms included: short-run stamping supplier, B2B wholesale metal components, custom stamping parts supplier.
Can in-die operations remove secondary processes and labor?
You spend money on tapping, deburr, and hardware install. Batches pile up, and WIP1 grows. So you want value added inside the die stroke2.
In-die tapping, coining, nut insertion, embossing, and part marking reduce touch labor. The press stroke1 drives each action in the right station. Travel and queues disappear, and location improves because the strip holds position.
I add in-die taps1 for M2–M8 when depth allows. So I remove stand-alone tapping cells and fixtures. I coin bosses to guide screws and logos. Then I insert nuts with presence sensors. And I laser mark parts2 for full traceability with 2D codes.
Controls that keep quality stable
I wire sensors for misfeeds, tap torque, and hardware presence. I stop the press on faults, so scrap stays low. Then I add poke-yoke blocks1 to prevent wrong coils. Also, I log every hit for PPAP2 and audits.
Cost model for in-die actions
I compare head price, station space, and cycle time1. I keep station count within press energy. Then I check spare inserts and service kits. And I confirm MRO stock2 before we ship the die.
| In-Die Action | Typical Range | Savings Lever |
|---|---|---|
| Tapping1 | M2–M8, pitch 0.4–1.25 | Removes tap cell labor and WIP |
| Coining | Bosses, logos, flats | Reduces machining or emboss pass |
| Nut insertion | M2–M6 clinch nuts | Cuts hardware bench labor |
| Laser mark2 | 2D codes, logos | Speeds traceability and QA |
Dive deeper: sensor strategy, service planning, and change control
I deploy sensors in layers. Feed sensors1 catch mis-advances. Load sensors catch broken punches. Presence sensors catch missing hardware. Torque sensors catch weak taps. Each sensor routes a stop that protects tools and parts. I record events by lot and cavity. I share dashboards that show faults per million hits. Then I fix root causes2 quickly.
Service planning1 keeps uptime high. I stock wear inserts and tap heads on site. I log sharpen counts for every punch. When counts near limits, I swap inserts during planned stops. I also maintain grease and lube plans with clear intervals. So surprises stay rare, and OEE2 stays high.
Change control keeps chaos out. When a drawing changes, I update sensors and checklists. I run a short capability test on the new feature. Then I release controlled lots with extra checks. This avoids quality drift1 after changes.
SEO terms included: in-die tapping supplier, custom fasteners wholesale, traceable stamped parts.
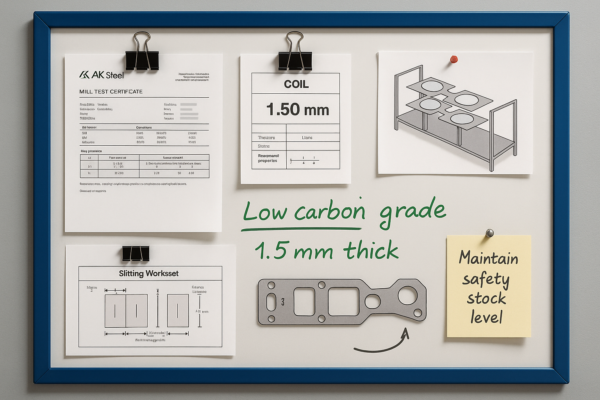
How do material choice and nesting lower scrap and total cost?
Material drives cost more than press time on many parts. Scrap can silently kill margin. So you want the best yield1 without hurting quality.
Yield jumps when the strip layout fits the coil and the part. Mirrored nests, shared edges, and narrow carriers reduce waste. Grain control1 protects bend and form quality. Data models2 guide the choice between coil and blanks.
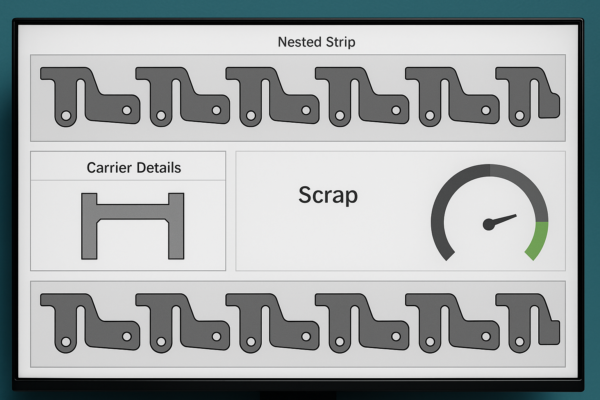
I chase yield to hit a clear scrap target. So I compare coil widths1 and mirror parts when angles allow. I cheat edges with scallops where burr rules permit. Then I pick coil or blanks based on size and supply. And I lock a backup coil grade2 to protect delivery.
Practical nesting playbook
I align parts along grain for springs and clips1. I rotate parts to balance burr direction. Then I share nests with you, so we agree on cost. Also, I track material lot data2, so we can trace performance by coil.
Yield math and risk flags
I compute yield before I quote any program. I share a table that shows savings versus risk1. Then I add SPC on thickness and hardness for tight parts. And I plan incoming checks2 that catch lot drift early.
| Choice | Yield Effect | Risk Note |
|---|---|---|
| Mirrored orientation1 | +2–6% | Check burr direction in assembly |
| Common-edge cuts2 | +1–3% | Watch edge roll-over on thick stock |
| Wider coil | +1–4% | Confirm press window and guides |
| Blank versus coil | +3–10% on huge parts | Verify transfer finger reach |
Dive deeper: coil strategy, supplier alignment, and resilience
I choose coil widths1 that match the strip and press window. I also model backup widths for supply shifts. Then I align with mills on hardness and surface finish. I avoid surprise changes that push burr higher. I keep mill certs2 linked to lots and nests. So we can trace results when issues appear.
I balance price with risk. A cheaper coil can raise burr and scrap. So I measure total cost1, not only price. I include yield, tool wear, clean-up labor, claims, and freight. Then I pick the best landed cost2, not the cheapest ticket.
Resilience matters on global routes. I approve a second alloy and a blanking source for critical parts. I also keep safety stock1 on long-lead coils. This protects schedules during shipping shocks2. Your line stays supplied, and your customers stay confident.
SEO terms included: cost-optimized nesting, B2B wholesale metal components, custom stamping parts supplier.
What quality and packaging steps lock in stable landed cost?
You lose money when defects travel to customers. You also lose money when cartons fail. So you need strong QA1 and strong packaging2 from the start.
Clear QA gates and ISTA-grade packaging1 protect total cost. PPAP plans2 prove control. Vision checks safeguard angles and holes. Trays, foam, and labels protect edges and speed inbound scans. These steps keep returns and claims near zero.
I define incoming checks for coils and hardware. I run first-off checks1 with fixtures at setup. Then I log inline data2 with vision and gauges. I close with final checks before pack and ship. So defects stop fast, and scrap stays low.
Pack design that survives global transit
I lock tray design with your geometry and planned stack. I set carton sizes1 for stable pallets and safe lifts. Then I add corner guards and wrap rules. I also add barcode formats2 that match your ERP. So receiving teams work fast, and damage rates stay tiny.
| Step | Target | Owner |
|---|---|---|
| Incoming material checks1 | Thickness, hardness, certs | QA |
| First-off approval | Angles, holes, flatness | QA + Process |
| Inline control | Vision hits and SPC | Process |
| Final inspection2 | AQL plan and torque | QA |
| Packaging spec | ISTA method and labels | Packaging |
| Logistics plan | Pallet map and route | Planning |
Dive deeper: PPAP discipline, data visibility, and returns prevention
I build PPAP1 with a clear control plan and gauge strategy. I define sample sizes and capability targets. I tag every gauge with calibration status2. Then I link readings to lot numbers and pallets. Audits become easy because data sits one click away.
I share dashboards that track Cp, Cpk, ppm, and damage rates. I color-code trends1, so teams spot issues early. When a metric moves, I assign actions with dates. Then I verify results and close actions. This loop holds capability during ramp and growth.
Finally, I prevent returns with simple field tools. I add QR codes1 that link to drawings, torque specs, and pack instructions. I add humidity cards2 to ocean packs. I add shock indicators for delicate edges. Claims drop because damage and misuse drop. Your customers keep faith, and your margin holds.
What should my five-minute cost checklist include before I lock the process?
You want a simple checklist that catches big risks. You also want clear numbers for your quote deck. So you can steer decisions fast.
A short, cross-functional checklist1 aligns design, volume, and supply risk. It covers tooling, presses, material, packaging, QA, and logistics. It assigns owners and dates. It reduces change orders and protects launch dates.

I ask five direct questions before I freeze the route. First, do volumes justify progressive1? Second, do flat tight parts fit compound? Third, do bend-dense narrow parts favor fourslide2? Fourth, does the strip layout hit a scrap target under 12%? Fifth, do we remove at least one secondary process?
Tooling, QA, and logistics in one view
I set a tool amortization plan tied to forecast. I define a PPAP plan1 with real coil lots. Then I lock carton sizes and pallet patterns. Also, I add barcode formats and humidity control2 when needed. So receiving stays fast, and damage stays low.
| Item | Target | Owner |
|---|---|---|
| Scrap % | ≤12% progressive, ≤10% fourslide | Process |
| Cp/Cpk critical1 | ≥1.33 at rate | QA |
| First ship date | Tool T0 + 4–6 weeks typical | PM |
| Pack spec2 | ISTA-compliant trays and cartons | Packaging |
| Backup plan | Second press and spare inserts | Planning |
Dive deeper: governance, dashboards, and supplier cadence
I run a weekly cadence with a simple agenda. We review tool build, coil bookings, and pack pilots. We track risk by colored tags1. Then we clear blockers with owners and dates. I keep dashboards public to avoid hidden surprises.
I also set decision gates1 that tie to drawings. Gate A locks features and tolerances. Gate B locks strip layout and nests. Gate C locks sensors and pack rules. Gate D locks PPAP2 and first lot. This rhythm keeps scope stable. It also builds trust between design and supply teams.
Conclusion
Choose progressive for volume1, compound for flats, transfer for deep forms, fourslide for bends; optimize material2, sensors, and packaging early.
I speak plainly because speed matters, and trust grows with clarity. I run tight timelines because missed seasons burn real money. So send me your prints, annual volumes, and pack rules. Then I map the right process, the right tooling, and the right QA plan. As a custom stamping parts supplier1 in China, Prime also supports CNC parts precision machining2, welding parts, fasteners, casting parts, and plastic parts. We founded Prime in 1993, and we run 10 production lines with ISO certification. We serve North America, Europe, the Middle East, Australia, and beyond. We work B2B wholesale only, and we deliver stable quality with fast lead times. Therefore, contact Prime now to get free DFM advice, a firm quote, and a tailored plan. We reply fast, we quote clearly, and we ship on time.
FAQs
What volumes justify progressive die stamping?
I recommend progressive when annual demand exceeds 50,000 parts1. The die cost spreads well at that level. Cycle time2 usually beats other routes. Then in-die actions remove extra labor and travel.
When should I select compound dies instead?
Choose compound for thin, flat parts with tight concentricity1. Washers, shims, and laminations fit well. Tooling stays simple, and lead time stays short. Complex bends favor fourslide or progressive.
How do I compare transfer and progressive on big parts?
I choose transfer when blank size grows large and forms go deep. Progressive wastes coil on huge outlines. Transfer reduces scrap with blanks. Staged draws also control thinning and surface quality1.
Where does fourslide give the best value?
Fourslide excels on narrow parts1 with many bends. Slides form from several sides in one cycle. Scrap stays low, and rate stays high. Inline vision protects angle and flatness.
How can I cut scrap without hurting quality?
I optimize nests and coil width1 before we buy steel. I mirror parts and share burr rules2. I align grain with bend needs and form direction. Yield rises, and parts still pass gauges.
Should I move tapping and hardware installation in-die?
Yes, when pitch, space, and torque allow. In-die taps and clinch nuts remove bench labor. Sensors confirm presence and torque. WIP shrinks, and traceability improves1.
What tolerances can I hold on progressive parts?
I hold ±0.05 mm1 on critical holes with stable strip. I relax non-critical profiles to ±0.10 mm to protect speed. SPC and capability runs2 confirm control over time.
Can Prime support hybrid parts with machining or welding?
Yes, we run stamping and CNC parts1 under one roof. We add weld studs, nuts, and simple welds. We also ship kits with fasteners2 and plastic parts. Your line receives matched sets, on time.
What certifications and audits can you support?
We hold ISO international quality certification1. We run PPAP or equivalent on demand. We store records for traceability. We welcome remote or on-site audits2 at your convenience.
How do you protect packaging and inbound quality?
I lock pack specs with ISTA methods1 and carton rules. I define trays, foam, and humidity control2 by route. I add barcode formats for fast receiving. Damage rates stay near zero globally.
Can you manage urgent bridge builds before hard tools?
Yes, we support short-run routes1 with laser blanks and modular forms. We ship pilot parts2 fast. We scale later with progressive or transfer dies. Your schedule stays safe during demand tests.
Do you support logos and custom marks on parts?
Yes, we coin logos or laser mark1 them in the die. We keep marks within cosmetic zones2. We provide clear drawings and samples. Your branding stays sharp and durable.
Contact Prime today:
Website: https://primecustomparts.com/
Email: [email protected]
Get free DFM, a firm quote, and a tailored plan within rapid lead times.
-
Explore this link to understand how laser marking enhances branding with precision and durability. ↩ ↩ ↩ ↩ ↩ ↩ ↩ ↩ ↩ ↩ ↩ ↩ ↩ ↩ ↩ ↩ ↩ ↩ ↩ ↩ ↩ ↩ ↩ ↩ ↩ ↩ ↩ ↩ ↩ ↩ ↩ ↩ ↩ ↩ ↩ ↩ ↩ ↩ ↩ ↩ ↩ ↩ ↩ ↩ ↩ ↩ ↩ ↩ ↩ ↩ ↩ ↩ ↩ ↩ ↩ ↩ ↩ ↩ ↩ ↩ ↩ ↩ ↩ ↩ ↩ ↩ ↩ ↩ ↩ ↩ ↩ ↩ ↩ ↩ ↩ ↩ ↩ ↩ ↩ ↩ ↩ ↩ ↩ ↩ ↩ ↩ ↩ ↩ ↩ ↩ ↩ ↩ ↩
-
Learn about cosmetic zones to see how they can improve the visual appeal of your branding. ↩ ↩ ↩ ↩ ↩ ↩ ↩ ↩ ↩ ↩ ↩ ↩ ↩ ↩ ↩ ↩ ↩ ↩ ↩ ↩ ↩ ↩ ↩ ↩ ↩ ↩ ↩ ↩ ↩ ↩ ↩ ↩ ↩ ↩ ↩ ↩ ↩ ↩ ↩ ↩ ↩ ↩ ↩ ↩ ↩ ↩ ↩ ↩ ↩ ↩ ↩ ↩ ↩ ↩ ↩ ↩ ↩ ↩ ↩ ↩ ↩ ↩ ↩ ↩ ↩ ↩ ↩ ↩ ↩ ↩ ↩ ↩ ↩ ↩ ↩ ↩ ↩ ↩ ↩ ↩