Cost-Effectiveness in Metal Stamping: Tips and Strategies?

Costs rise and launches slip. I understand the pressure. I share clear stamping strategies that cut spend fast without new risk.
Metal stamping becomes cost-effective1 when design, process, and supply choices align. Match geometry and volume to the right die path. Add in-die features and smart packaging to reduce total landed cost. Use ISO-based controls2 to stabilize quality, speed, and audits.
Please stay with me, because I turn complex trade-offs1 into simple steps. Then you act today with less risk and clearer math2.
How do I reduce stamping cost at the design stage?
You want savings without defects. So I attack cost before steel cuts. I simplify geometry1 and set realistic tolerances2.
I reduce total cost1 by aligning features with capable processes. I choose draw-friendly grades, unify radii, and improve strip nesting. I integrate tapping, coining, and deburring in-die. Early DFM2 protects quality and shortens lead time.
Dive deeper: practical DFM that buyers can apply now
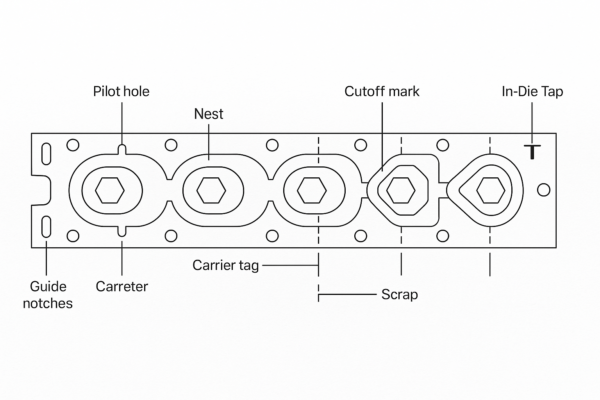
I start with a short DFM call and one goal. I confirm the part function and the worst failure mode1. Then I round sharp internal corners to reduce stress spikes. I align hole patterns with feed direction to unlock better nesting. Also, I standardize bend radii2 across the family, so I reuse stations. Because I add pilot holes early, I lock pitch and keep each station synchronized. These moves protect function while trimming coil width and cycle time.
Next, I map each tolerance to a capable operation. I pierce after forming when position matters most. I set edge specs that the wipe die can hit without secondary deburr. I assign flatness zones to a planned restrike station. Therefore, I protect Cpk1 and keep audits short. If a machined seat is truly critical, I schedule a light pass in our CNC parts precision machining2 cell. However, I remove machining where a die can hold the number. This balance protects budget and speed for global lanes.
I also design for packaging from day one. I soften edges that could cut foam or film. I pick rib patterns that stack well in trays. I add a small emboss for logo and date to avoid printing. Finally, I include barcode fields on the drawing, which speeds receiving teams. Buyers who search custom stamping parts supplier1 and one-stop metal parts processing2 want these details, not slogans.
| DFM Lever | Action I Take | Cost Impact |
|---|---|---|
| Material grade | choose draw-friendly steel or DDQ stainless1 | fewer splits and longer tool life |
| Thickness | reduce gauge and add ribs | lower coil cost and weight2 |
| Tolerances | relax non-critical dimensions | higher Cpk and less scrap |
| Nesting | rotate and interlock blanks | scrap drops by 3–12% |
| In-die ops | tap, coin, shave, stake | remove secondary cells |
Which stamping process delivers the lowest total cost?
Process choice moves more dollars1 than any quote line. So I match geometry and volume2 to the right method with facts.
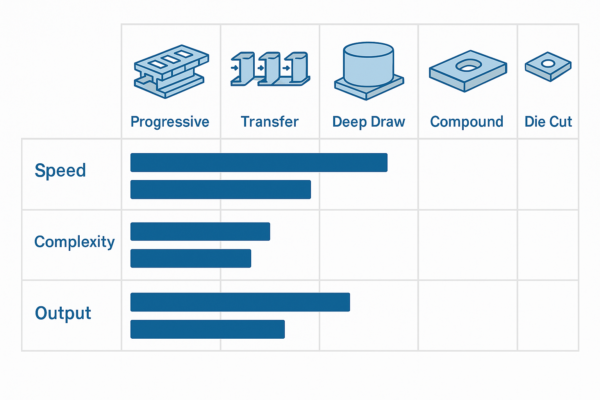
Progressive dies1 win on steady, high volume. Single-hit and compound dies suit short runs and tight concentricity. Transfer dies handle large shells and deep forms. Deep drawing2 replaces weldments for cups and enclosures. I compare tooling plus unit cost across realistic volumes.
Dive deeper: decide with honest windows and crossover math
I keep the framework simple and repeatable. First, I confirm annual demand1 and peak rate. Then I review depth, flange freedom, and hole position. I simulate strip utilization and station count. I check press tonnage, shut height, and lift. Finally, I compute total landed cost2, including packaging and freight. This method removes bias and supports clean quotes.
For progressive dies, I drive tight nesting and add in-die tapping or coining. I place sensors for miss-feed, slug pull, and over-tonnage. I standardize clamps and shoes for SMED. Therefore, I hold a low unit price even as SKUs rotate. This helps programs that need rapid lead time stamping1 from an experienced custom stamping parts supplier2.
For transfer dies, I remove the strip carrier and free the flange. I stage draw, redraw, hem, and trim. I pierce after forming1 to stabilize hole position. I shrink coil width, raise yield, and remove weldments on large shells. The tool costs more, but unit price wins beyond the crossover lot. Engineers often search transfer die stamping supplier2 for this reason.
For deep draw, I manage L/D ratios with guided redraw rings and light ironing when needed. I choose DDQ grades1 for deep stainless parts. I trim in-die and pierce after draw. I often replace multi-piece weldments with one drawn shell. That swap cuts leak paths and inspection time. If a face needs machining, I add a quick pass in CNC parts precision machining2. Therefore, total cost and risk fall together.
Simple and compound dies serve short runs. I use stock shoes and off-the-shelf punches. I design modular inserts1 for pattern changes. I often beat laser and waterjet after the first few thousand parts. I ship with barcodes and heat-lot labels. Because speed matters, I finish urgent orders2 in days.
| Technique | Best Volume | Geometry Fit | Tooling Cost | Scrap Rate | Speed | Typical Parts |
|---|---|---|---|---|---|---|
| Progressive1 | 100k+ | steady bends, pierce, coin | High | Low | Very high | brackets, terminals |
| Single-hit2 | 1k–20k | simple blanks, pierce | Low | Medium | Medium | washers, tabs |
| Compound | 10k–100k | tight blank + pierce | Medium | Low | High | rings, gaskets |
| Transfer | 50k+ | large shells, deep forms | High | Low | High | pans, housings |
| Deep draw | 20k+ | cups, enclosures | High | Medium | High | lids, covers |
How does progressive die stamping drive the lowest unit price?
You want volume and stable quality. Progressive dies1 often deliver the best unit price when the strip design2 stays smart.
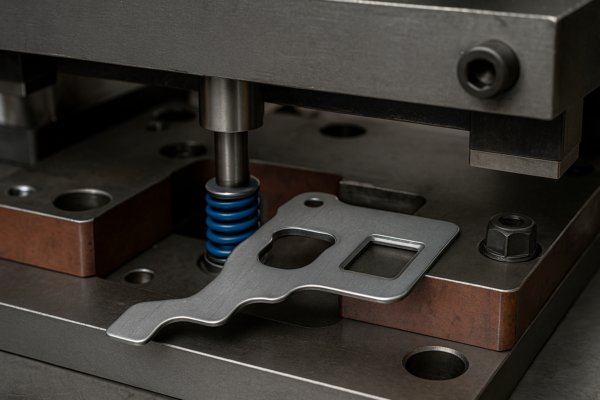
A progressive die1 moves a strip through pierce, form, coin, tap, and cut. The strip carries the part, so handling drops. Tight nesting reduces scrap. Sensors detect faults early. Unit cost falls as strokes per minute rise.
Dive deeper: design details, controls, and bankable savings
I start with a DFM call and clear edits. I round internal corners. I align pierce patterns1 with feed direction to boost nesting. I add pilots early and restrike near final cut for flatness. I place shave only on edges that control assembly fit2. These steps keep station count low and speed high.
I build a risk map before steel cuts. I add miss-feed sensors1 near critical pilots. I monitor tonnage to catch overloads. I set a lube plan with the right viscosity and flow. I standardize clamps and shoes for SMED. Our ten lines run changeovers under thirty minutes. Therefore, your rapid lead time stamping2 stays real during peak weeks.
I integrate features inside the die. I coin bosses to set stack height. I emboss ribs to raise stiffness without thicker stock. I tap threads in-die when sizes stay stable. If a face needs milling, I route it to our CNC parts precision machining1 cell. Because Prime runs one-stop metal parts processing, I shorten travel and reduce WIP. Your audit moves fast with PPAP, FAI, and Cpk charts. Searchers for progressive die stamping China2 and ISO-certified metal stamping manufacturer expect this level of control.
| Setup Lever | What I Do | Result |
|---|---|---|
| Nesting | rotate blanks for best fit | scrap drops by 3–10%1 |
| In-die ops | tap, coin, shave, stake | cells removed |
| Sensor plan | place sensors by risk | crashes prevented |
| Quick change | standardized hardware | downtime reduced2 |
| Lube control | meter film thickness | tool life extended |
How do I hold quality while cutting cost?
Lower price means nothing if quality drifts1. So I build controls that protect both yield and schedule2 at the press.
I run an ISO-based plan1 with PPAP or FAI. I use SPC at the press. I place sensors by risk. I schedule preventive tool work2. I add traceability and photo pack lists. These steps keep shipments on time.

Dive deeper: control plans, documents, and integrated scope
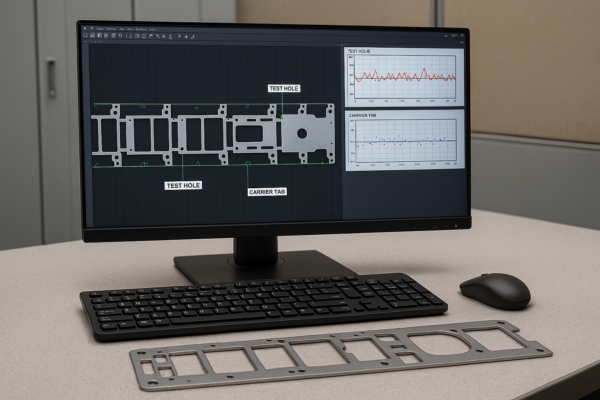
I build a control plan1 tied to stations. I define first-off, in-process, and last-off checks. I link each feature to the capable operation. I log results to part barcodes for traceability. I track tool wear2 and set sharpening windows for punches. I monitor feed length and shut height. Because I close these loops, I prevent surprises and protect your schedule.
On documents, I prepare PPAP or FAI packs1 fast. I include control plans, MSA notes, and capability charts. I attach inspection photos linked to barcodes. Audits move quickly because evidence follows the part path. For long programs, I trend Cpk and open actions2 before issues escalate.
I expand scope only when it reduces risk. If you need studs or nuts, I run them in our welding parts factory China1 cell. If tight faces or bores matter, I route parts through CNC parts precision machining2. When a mating piece suits casting, I bring our ISO-certified casting parts manufacturer partners into the DFM call. We align datums and stacks before steel cuts. This one-stop model reduces handoffs and delays for global buyers.
| Control | Why I Use It | Result |
|---|---|---|
| Miss-feed sensor1 | stops bad index | die crash avoided |
| Tonnage monitor | flags overload | tool protected |
| Vision presence | verifies features | higher outgoing yield |
| Lube metering | controls film | longer tool life |
| Cpk dashboard2 | trends key sizes | stable processes |
I share one short case. A North American client faced late lineside alarms1. We moved a critical pierce to after draw. We added a restrike and a simple vision gate. Scrap fell by 62% within three weeks. Shipments stabilized and cost targets held.
How do packaging and logistics protect cost and reputation?
Hidden costs1 grow in transit. So I design robust packs2 and clear documents. Clean arrivals protect margin and brand.
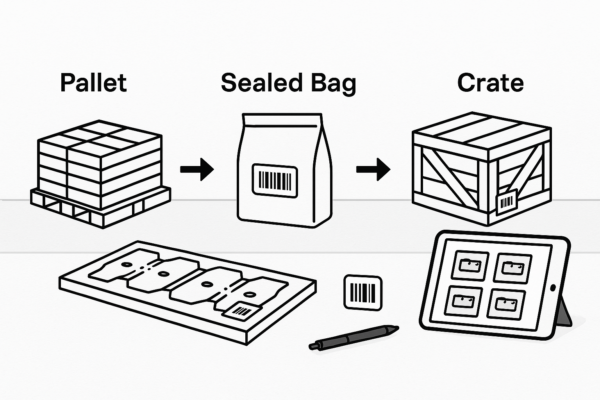
I choose VCI materials1, sealed bags2, and foam trays for finish care. I add corner guards and export crates for long lanes. I attach barcode labels and photo pack lists. These steps prevent damage, disputes, and delays.
Dive deeper: model total landed cost, not just unit price
I calculate more than ex-works price1. I include freight, insurance, duties, and expected damage rates. I measure receiving time by packaging style. A clean pack saves minutes per pallet and reduces claims. I use VCI wrap2 and sealed bags for humid lanes. I add foam nests for plated finishes. I specify corner guards and crate lashing for ocean routes. I log claims by route and season and adjust the spec with data.
I also combine shipments when it helps. Stamped brackets can ride with precision fasteners wholesale1 in custom trays2. That reduces vendor count and dock touches. I print barcodes with part, heat lot, and PO details. I attach a photo pack list to each load. Warehouse teams clear pallets faster. Because we export to North America, Europe, the Middle East, and Australia, I standardize crates and documents for each region. Therefore, your first lot and your fiftieth lot arrive the same way.
| Risk | Action | Result |
|---|---|---|
| Moisture | VCI paper and desiccant1 | no rust |
| Scuffing | film and foam nests | clean finish |
| Crush | trays and corner guards | safe stacks |
| Mislabels | barcode and photo list | fast receiving |
| Long ocean lane | export crate spec2 | stable pallets |
What tooling and maintenance strategies cut cost over the program life?
Tooling choices shape years of cost. So I design tools for performance1, repair2, and repeatability, not just launch price.
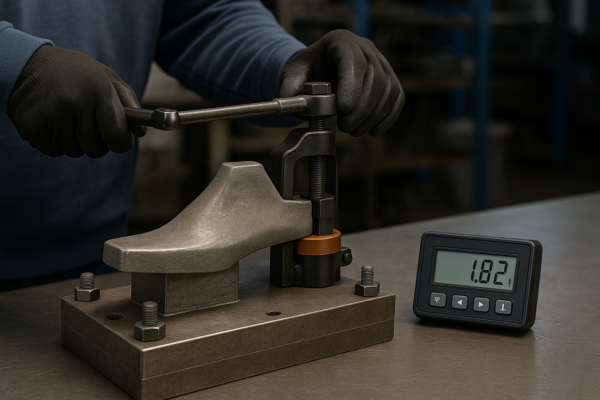
I pick steels by wear pattern1 and run length. I use inserts on wear points. I standardize components for fast swaps. Planned maintenance protects yield and schedule.
Dive deeper: materials, spares, and uptime math that actually pays back
I do not overbuild every station. I place carbide where abrasion dominates1. I choose high-grade tool steel2 for pilots, rings, and pierce punches. I add nitriding or coatings only when tests prove enough gain. This balance keeps first cost sane and repair time short.
I stock spare inserts1 for known wear points. I label each tool with a QR code that links to drawings, torque specs, and maintenance logs2. I schedule inspections by stroke count, not by vague dates. I measure punch edge radius and cut a touch-up before burrs spike. I change lube filters on a calendar because dirty lube kills tools silently. These steps raise uptime and hold Cpk without drama.
I also standardize hardware across families. I keep clamps, parallels, and shoes common. Setups become repeatable and fast. My team executes SMED steps1 with checklists. I track changeover time and share weekly charts. Because I remove variation, I protect your rapid lead time stamping2 promise during peak months.
Finally, I show total program math. I compare “cheap tool + slow running” against “optimized tool + fast running.” I include scrap, downtime, rework, and packaging losses. Most programs win with the optimized plan1. Buyers who search OEM stamping parts China2 want this full picture, not just a tool quote.
| Decision Area | My Choice | Why It Saves Money |
|---|---|---|
| Tool steel1 | match grade to wear mode | fewer rebuilds |
| Inserts | add where abrasion peaks | quick repairs |
| Standard parts | unify clamps and shoes | faster setups |
| Maintenance2 | stroke-based plans | stable Cpk |
| Spares | pre-cut wear inserts | minimal downtime |
Conclusion
Smart DFM1, right processes, tight controls, and robust packaging cut costs while protecting quality, speed, compliance, and global delivery reliability2.
Ready to reduce cost without risk? Contact Prime on our website today. Share annual volume, drawings, and tolerances. I will compare progressive, transfer, deep draw, and simple dies with a clear crossover chart. You receive a fast quote, a free DFM pack, and a custom packaging plan. Because we run ten lines and hold ISO credentials, we ship quickly with stable quality. Send your inquiry now to your custom stamping parts supplier for one-stop metal parts processing that scales.
-
Exploring this link will provide insights into how Smart DFM can enhance your manufacturing processes and reduce costs. ↩ ↩ ↩ ↩ ↩ ↩ ↩ ↩ ↩ ↩ ↩ ↩ ↩ ↩ ↩ ↩ ↩ ↩ ↩ ↩ ↩ ↩ ↩ ↩ ↩ ↩ ↩ ↩ ↩ ↩ ↩ ↩ ↩ ↩ ↩ ↩ ↩ ↩ ↩ ↩ ↩ ↩
-
This resource will help you understand strategies to maintain reliability in global deliveries, crucial for business success. ↩ ↩ ↩ ↩ ↩ ↩ ↩ ↩ ↩ ↩ ↩ ↩ ↩ ↩ ↩ ↩ ↩ ↩ ↩ ↩ ↩ ↩ ↩ ↩ ↩ ↩ ↩ ↩ ↩ ↩ ↩ ↩ ↩ ↩ ↩ ↩ ↩ ↩ ↩