How Are Metal Stamping Parts a Cost-Effective Choice?

Budgets tighten. Launch dates slip. I show clear actions that protect cash1, quality, and time.
Metal stamping cuts total cost when teams align design, materials, tooling, QC, and logistics. Progressive dies reduce handling and scrap. Standard grades and early DFM stabilize price and yield. In-house tooling shortens loops and protects uptime.
So you want proof and clear steps. You also want supplier accountability1. I bring simple math, real examples, and factory discipline2. Then you can defend every decision with facts.
What Defines Real Total Cost of Ownership (TCO) in Stamping?
Projects start with price pressure1. Expectations rise, and delays add risk. I analyze total cost2, not only unit price.
TCO1 includes tooling, material, press time, labor, scrap, QC, packaging, freight, and risk. Stamping reduces several buckets at once. Progressive dies2 also cut setups and raise repeatability at volume.

I separate fixed from variable costs1. Then I model realistic volumes and release plans2. I include returns, claims, and rework. Because those line items often surprise busy teams later.
I also compare alternatives honestly. So I show stamping against CNC milling1, laser plus brake, and casting plus machining. I add duty and freight. Therefore the chart reflects your real landed cost2.
Dive Deeper: TCO Signals That Predict Success
The levers that move the TCO curve
| Cost Bucket | Stamping Lever | Impact on Cost | How I Apply It |
|---|---|---|---|
| Tooling | Amortize by gates | Lowers cash shock | Tie recovery to releases |
| Material | Standard stock1 | Cuts coil price | Match mill inventory |
| Labor | Progressive die | Reduces handling | One press, one path |
| Scrap | Optimized strip | Raises yield | Align pitch and features |
| QC | In-die stability2 | Cuts variation | Sensors and clear datums |
| Packaging | Early trials | Prevents claims | VCI, foam, drop tests |
| Freight | Predictable lots | Keeps rates low | Weekly vessel windows |
Why sticker price misleads buyers
Sticker price hides setups, claims, and speed. One cheap part can cost more after delays. Therefore I test programs against failure modes1 first. That discipline keeps budgets safe.
How I model fixed and variable cost
I split tooling into defined gates. Then I distribute gates across releases. I compute cycle time1 and scrap for each method. I add a small risk reserve for pilots. I never skip packaging math2 because damage erases savings.
When Do Stamping Parts Beat CNC, Laser, or Casting?
Teams often debate methods for weeks. Meetings grow, and schedules slip. I let the numbers decide quickly1.
Stamping wins when volume grows and features suit strip flow. CNC wins at ultra-low volume1. Laser and brake win on large panels or frequent changes. Casting wins on thick 3D forms at scale2.

I chart annual volume against geometry. Then I overlay tooling cost1 and takt. I test strip yield2 and press tonnage. I review coating and surface rules. Therefore the method choice becomes obvious.
I also include assembly and logistics1. Because weld tabs, fasteners, and carton patterns2 change the math. So the selection covers the whole program, not only parts.
Dive Deeper: A Buyer’s Field Guide
Fast chooser table for busy teams
| Scenario | Best Method | Why It Wins | Watch Outs |
|---|---|---|---|
| 20k prototypes | CNC machining1 | No tooling | Higher per-part cost |
| 80k mid-volume | Simple die stamping | Low variable cost | Fewer features |
| 300k+ stable | Progressive die2 | Speed and repeatability | Upfront tooling |
| Big flat parts | Laser + brake | Flexibility | Slower takt |
| Thick 3D forms | Casting + machining | Near-net shape | Tooling + porosity |
Kevin’s seasonal volume problem
Kevin faced sharp peaks near holidays. So I split his yearly plan into four gates. I used a progressive die with modular inserts. We cut cycle time1 by 31% and scrap2 by 17%. Therefore peak orders shipped without overtime.
How we protected risk
I stocked spare punches and buttons1. I set hit-based PM2 with tablets at the press. I tied packaging trials to T1. Claims fell to near zero. Finance liked the boring, predictable trend.
Do Tooling Investments Pay Back Faster Than Expected?
Tooling feels heavy at kickoff. Cash gets tight, and nerves spike. I reframe tooling1 as an asset that prints savings2 every shift.
Amortization spreads cost across volume1. Progressive dies pay back through faster cycles2, lower scrap, and fewer setups. Clear gates reduce risk for both sides.

I connect recovery to sell-through1. So gates mirror real demand. I align coil bookings at each gate. That locks price and prevents spot buys. Then the math holds all year.
I publish a unit-cost slider2 that both teams see. Alignment replaces arguments. Therefore decisions move fast and stay rational.
Dive Deeper: Tool ROI Without Fuzzy Math
The three drivers that control ROI
| Driver | What Improves ROI | How I Measure |
|---|---|---|
| Cycle time1 | Higher SPM with stability | Press logs and counters |
| Scrap rate2 | Better nesting and vents | Yield from strip trials |
| Setup frequency | Fewer changeovers | Calendar and run logs |
Practical risks and how I cap them
I keep a labeled spare kit for each die. I define hit-based PM1 with clear thresholds. I run pilots on the production press. I add burr direction2 to travelers. Then packers protect critical faces.
Field example with clear data
A buyer targeted 600k parts yearly. I proposed a progressive die1 with three modular inserts. We cut cycle time2 by 32% and scrap by 18%. The tool paid back before gate two. CPk stayed above targets. Therefore margin stayed safe during peaks.
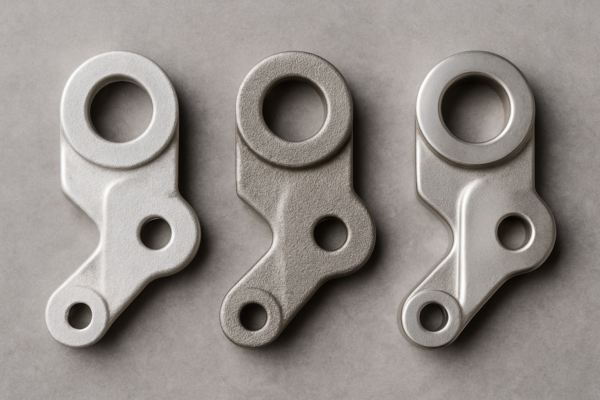
Can Design for Stamping Cut Cost Without Compromise?
Design creep adds stations and stress. Extra features slow builds and raise repair time. I remove non-value features while I protect function.
DFM trims bends, tight radii, and exotic coins.1 Tolerances match function, not habit.2 Dies shrink, runs speed up, and quality stays predictable.

I start with strict, simple rules. I set inside radius at least material thickness1. I align holes to one datum. I add corner reliefs2. I remove micro features that force long EDM time. So the die builds faster and lasts longer.
I also map cosmetic faces1 early. I direct burr away from mating surfaces. Then packaging protects the right zones. Therefore assembly teams2 smile instead of reworking parts.
Dive Deeper: A Practical DFM Workflow
My five-step sprint that finishes fast
| Step | Action | Purpose | Time Cost |
|---|---|---|---|
| Print review | Tag risky features1 | Align team early | 30 minutes |
| Light simulation | Check strain, springback2 | Prevent rework | 60 minutes |
| PLA check tool | Confirm by hand | Catch surprises | Same day |
| Strip layout | Improve nesting | Lift yield | 1–2 hours |
| Change log | Share one page | Keep clarity | 30 minutes |
Why simple rules beat long reports
Teams move fast when rules stay clear. “Radius ≥ thickness1” avoids cracking. “Hole-to-edge ≥ 1.5× thickness2” protects edges. “One datum” keeps pierces aligned. “Reliefs on corners” release stress. Therefore everyone knows what to do next.
Link DFM to downstream savings
Good DFM shortens tryouts. It reduces polish hours and sensor trips. It also makes packing safer because sharp edges fade. As a custom stamping parts supplier in China1, I tie DFM to CNC parts precision machining2 only when features truly demand it. As an ISO-certified casting parts manufacturer, I propose cast-and-stamp hybrids when the math supports it.
Why Do Progressive Dies Outperform Multi-Stage Lines at Volume?
Extra setups drain money. Parts then drift between shifts. I select progressive dies when yearly volume demands speed and stability.
Progressive dies1 form, pierce, and cut in one press. Cycle time drops, repeatability rises, and scrap falls. Setup time shrinks because the strip path stays constant.

I check takt, pitch, and tonnage. I design the strip for yield and stability1. I size the press and feeder for real loads. I add sensors for misfeeds and slug pull2. So the die stops before damage grows.
I plan quick-change inserts1 at high-wear stations. I stock spare punches and buttons2 with each tool. Maintenance windows stay short and planned. Therefore uptime remains high across shifts.
Dive Deeper: Throughput, Quality, and Risk
Head-to-head comparison that buyers trust
| Factor | Progressive Die | Multi-Stage Line | Comment |
|---|---|---|---|
| Cycle time1 | Fast | Slow | One press wins |
| Repeatability2 | High | Medium | One strip path |
| Setup time | Low | High | Fewer changes |
| Scrap rate | Low | Medium | Better nesting |
| Flexibility | Medium | High | Volume-driven |
| Upfront cost | Higher | Lower | Pays back at scale |
Throughput math you can verify
One 200-ton press1 at 60 SPM ships strong volume. Even at 70% net efficiency, daily output stays high. I share clear models that link SPM, pitch, and coil width. Then capacity planning2 turns simple and honest.
Risk control with spare kits
High-load forms wear first. So I design those forms as inserts. I log hits and inspect faces on schedule. Labeled kits sit beside the press. A trained tech returns the die to service in minutes. As a progressive die stamping supplier1, I treat uptime2 like a product we deliver.
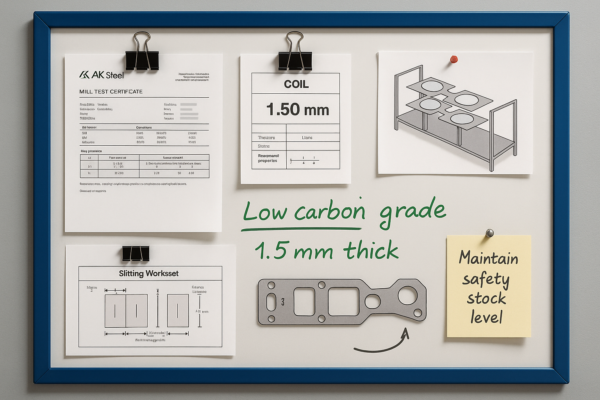
How Do Material Choices Change Cost and Performance?
Late material changes1 break plans. Mills add premiums and delays. I lock grade and thickness2 early to protect cost and time.
Standard grades lower coil price1. Stable thickness improves strip yield2 and press speed. Dual sourcing adds flexibility without chaos.

I begin with function and environment. I choose the simplest grade that meets strength and corrosion needs1. I avoid exotic coatings2 without proof. Exotic choices often add MOQ and risk. Therefore standard stock stays my first path.
I align thickness with mill stock1. Slit plans then use full width. I confirm burr direction2 on the print. Assembly stays smooth, and cycle time stays strong.
Dive Deeper: Yield, Lube, and Surface Control
Material options and cost signals
| Option | Availability | Yield Impact | Cost Result |
|---|---|---|---|
| Low-carbon common1 | High | Good | Low price |
| HSLA common | Medium | Good | Balanced |
| Exotic coated2 | Low | Varies | High price |
| Over-thick spec | High | Poor | Scrap rises |
Yield as the hidden profit lever
Strip yield1 hides money in plain sight. Small moves in pitch or feature placement raise yield. So I sit with the toolmaker and test nests. We shift non-critical holes and webs by tenths. Savings scale2 each shift across the year.
Lubrication and insert life
I pair lubricant with material and station load. Thin stainless wants a different film than coated steel. I track filter life and pressure. A steady film1 prevents galling and extends inserts. Therefore uptime improves and tooling cost2 drops.
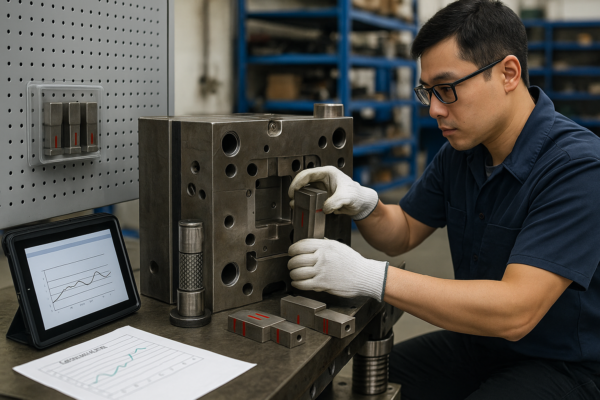
Can In-House Tooling and Preventive Maintenance Transform Uptime?
Outsourced tooling adds handoffs and delay. Minor fixes then take days. I choose in-house toolrooms with on-press tryout.
In-house tooling1 shortens loops. Teams design, cut, fit, try out, and repair next door. Preventive maintenance and modular inserts protect uptime and lifetime cost.

I sit with the toolmaker during design1. I catch hard corners early. I build stock reliefs that simplify fitting. I try out on the production press2. Freight delay disappears. Therefore debug time shrinks.
I align PPAP1 with the tool plan. Gages match process realities. I track hit counts from day one. PM starts as a habit2, not an afterthought.
Dive Deeper: The PM System That Actually Works
What great in-house support includes
| Capability | Cost Lever | What I Verify |
|---|---|---|
| Wire-EDM + jig grind | Precision inserts1 | Surface finish targets |
| On-press tryout | Debug speed | Real takt and loads |
| Spare management | Fewer long stops | Min-max lists and IDs |
| QC lab with MSA | Stable quality2 | CPk and R\&R |
| Packaging cell | Damage control | Drop and vibration tests |
The routine that never gets old
I polish at 50k hits. I clean slug vents1 weekly. I test sensors at shift start. I verify lube flow2 daily. I replace inserts at limits, not at failure. Therefore breakdowns stay rare and short.
Data that shop teams trust
I show hit counts on tablets1 beside each press. I plot trends so issues appear early. I keep photos of wear faces by date. Everyone sees the story and knows the next move. Culture, not posters, protects uptime2.
Does Packaging, QC, and Logistics Lock Savings In?
Good parts still fail after rough travel. Claims then erase savings. I lock packaging1, QC, and logistics2 into the tooling plan.
Packaging protects edges and faces. QC catches drift before shipment1. Logistics keeps flow steady. Together, these blocks preserve the savings that stamping creates2.

I map sharp edges and stack points. I choose trays, foam, or VCI. I run drop and vibration tests1 early. I mark burr direction2 on travelers. Packers then stack correctly. Therefore finish survives long voyages.
I set first-piece1 and hourly checks. I keep simple go/no-go gages on the line. I photo-log2 each lot before shipment. Clear evidence ends debates fast and protects trust.
Dive Deeper: Connecting Plant Wins to Market Wins
Practical controls that protect shipments
| Control Item | Frequency | Tool | Purpose |
|---|---|---|---|
| First-piece layout | Start of shift | Full gages | Baseline |
| Hourly check | Hourly | Key gages1 | Drift catch |
| Surface check | Per pallet | Visual + cards | Cosmetic |
| Carton audit | Per lot | Drop test2 | Transit safety |
| Final review | Before ship | Photos + pack list | Traceability |
Logistics as the glue
Steady sailings beat chaotic bursts. Planned lots1 keep rates fair. Predictable arrivals calm your warehouse. I size cartons and pallets for your racks. I add barcodes2 that your WMS reads on day one. Therefore receiving stays smooth and fast.
Packaging design as engineering
I treat packaging like a part. I prototype dunnage and trays. I record crush tests1 and humidity swings. I track corrosion cards2 over voyages. Data, not hope, keeps surfaces perfect.
How Should B2B Buyers Source, Quote, and Audit a Stamping Supplier?
Search results look crowded. Choices blur quickly. I give you a simple playbook1 for fast, confident action2.
Shortlist ISO-certified factories1 with in-house tooling and progressive experience. Verify capacity, QC data2, and packaging standards. Quote with clear gates and delivery rules. Audit with facts, not feelings.

I start with proof, not promises. I ask for ISO scope1, CPk records, and PPAP samples2. I request a live video walk of presses, toolroom, and packaging cells. I confirm spare kits and PM logs per die. Therefore I see the truth, not a brochure.
I request two pricing paths1: simple die and progressive die. I request coil options with yield math. I request a packing trial plan2 with drop tests and photos. So the quote covers everything that can hurt margin later.
Dive Deeper: RFQ and Audit Tools You Can Reuse
RFQ checklist that speeds strong quotes
| RFQ Item | Why It Matters | What I Expect |
|---|---|---|
| 2D + 3D files1 | Remove guesswork | STEP, PDF with GD\&T |
| Annual volume + gates | Tie amortization | Quarterly releases |
| Tolerances by function | Protect takt | Loosen non-critical |
| Preferred grade + thickness | Lock coil price | Standard stock first |
| Finish and packaging rules | Prevent claims | VCI, foam, labels |
| Inspection plan2 | Honest capacity | Hourly checks, CPk |
Selection signals that rarely lie
You see wire-EDM1, grinders, and fitting benches. You see labeled spare kits and PM boards. You see press load charts and hit counters. You see packaging SOPs2 with photos. Therefore you know the factory is real.
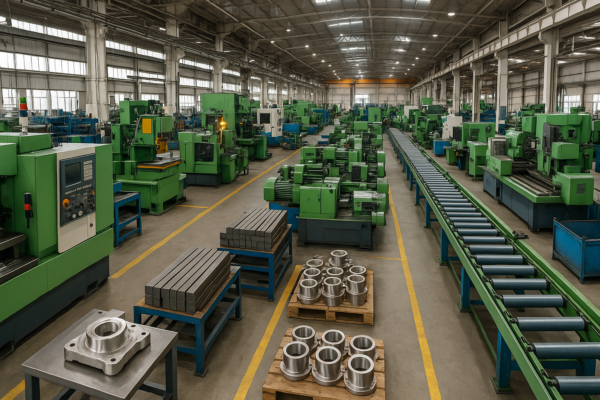
Why Prime checks the boxes
We run ten lines and an in-house toolroom. We hold ISO quality certifications. We export to North America, Europe, the Middle East, and Australia. As a custom stamping parts supplier1, we also support CNC parts precision machining2, welding parts OEM factory assemblies, fasteners wholesale manufacturer programs, and ISO-certified casting parts manufacturer projects. Therefore you source matched parts with one accountable team.
Conclusion
Align design, tooling, materials, QC, and logistics. Choose progressive dies1. Lock PM. Then stamping delivers reliable, scalable, low total cost2.
FAQs
Q1: When do metal stamping parts1 beat CNC parts2 on cost?
Stamping wins at volume. Cycle time drops and scrap falls. Tooling pays back through speed and consistency. CNC fits prototypes and small runs.
Q2: Can you waive tooling if I commit volume?
Yes. We structure gates and amortization. We align coil bookings and press time. We publish a unit-cost slider for finance.
Q3: How do you control quality for tight tolerances?
We set CPk goals1 and hourly checks. We use go/no-go gages and optical tools. We run PPAP with full MSA data.
Q4: What certifications does Prime hold?
We hold ISO quality certifications2. We apply the same control to casting, welding, and fasteners. We audit labs and processes regularly.
Q5: Can you support CNC, casting, and plastics with stamping?
Yes. We provide one-stop services. We handle CNC parts precision machining1, ISO-certified casting parts2, and plastic parts. We deliver matched assemblies.
Q6: How do you pack for sensitive surfaces?
We use VCI, foam-in-place, and trays. We run drop and vibration tests early. We document burr direction and stack patterns.
Q7: Do you serve global markets with stable lead times1?
Yes. We ship to North America, Europe, the Middle East, and Australia. We plan vessels weekly. We provide ASN tracking and buffer stock.
Q8: What makes Prime different from trading companies?
We are a factory with ten production lines. We build dies in-house and run high-volume presses2. We communicate clearly and ship fast.
Q9: Can you quote progressive and transfer options together?
Yes. We model both paths. We share cycle time1, scrap, tooling hours, and strip yield. You choose with full clarity.
Q10: Do you offer branded packaging and labels2?
Yes. We add logos and barcodes. We match your warehouse rules. We keep cartons scan-ready on day one.
Additional Image Placeholders for Your Content Team

Why Work with Prime Today
We founded Prime in 1993. We run ten production lines in China. We focus on B2B wholesale programs only. We offer custom stamping parts1, CNC machining2, welding parts, casting parts, fasteners, and plastic parts. We maintain ISO-certified systems and strong QC labs. We protect parts with strict packaging rules. We support North America, Europe, the Middle East, Australia, and global markets. We speak plainly, move fast, and protect your timeline.
Get a free DFM review, firm lead times, and a clear quote now.
Website: https://primecustomparts.com/
Email: [email protected]
Send your RFQ with drawings, annual volumes, tolerances, and packaging rules. I will reply fast with a plan, a price, and a launch date.
-
Explore this link to understand how custom stamping parts can enhance production efficiency and reduce costs. ↩ ↩ ↩ ↩ ↩ ↩ ↩ ↩ ↩ ↩ ↩ ↩ ↩ ↩ ↩ ↩ ↩ ↩ ↩ ↩ ↩ ↩ ↩ ↩ ↩ ↩ ↩ ↩ ↩ ↩ ↩ ↩ ↩ ↩ ↩ ↩ ↩ ↩ ↩ ↩ ↩ ↩ ↩ ↩ ↩ ↩ ↩ ↩ ↩ ↩ ↩ ↩ ↩ ↩ ↩ ↩ ↩ ↩ ↩ ↩ ↩ ↩ ↩ ↩ ↩ ↩ ↩ ↩
-
Discover the advantages of CNC machining for achieving high precision and quality in manufacturing processes. ↩ ↩ ↩ ↩ ↩ ↩ ↩ ↩ ↩ ↩ ↩ ↩ ↩ ↩ ↩ ↩ ↩ ↩ ↩ ↩ ↩ ↩ ↩ ↩ ↩ ↩ ↩ ↩ ↩ ↩ ↩ ↩ ↩ ↩ ↩ ↩ ↩ ↩ ↩ ↩ ↩ ↩ ↩ ↩ ↩ ↩ ↩ ↩ ↩ ↩ ↩ ↩ ↩ ↩ ↩ ↩ ↩ ↩ ↩ ↩ ↩ ↩ ↩