How can I cut total cost for precision stamped metal parts?
Margins feel tight. Lead times slip. Quality noise grows. I give clear, low-risk steps now.
You can cut stamping cost1 by fixing design waste, choosing the right die path, stabilizing materials, and standardizing packaging. Then you protect launches with SPC, smart logistics, and clean change control. A one-stop, ISO-certified factory partner2 reduces total landed cost and risk.
Time is money, so I keep this guide practical. I show actions, numbers, and proof1. I draw from Prime’s shop floor2, not theory.
Which design moves reduce stamping cost the fastest?
Bad design choices add cost on day one. Material waste rises, and rework climbs. So I start with quick design wins1.
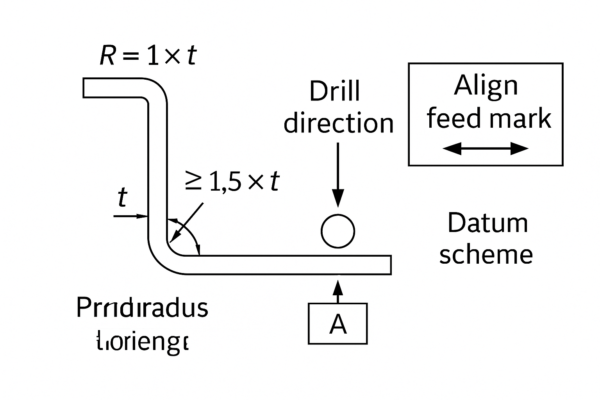
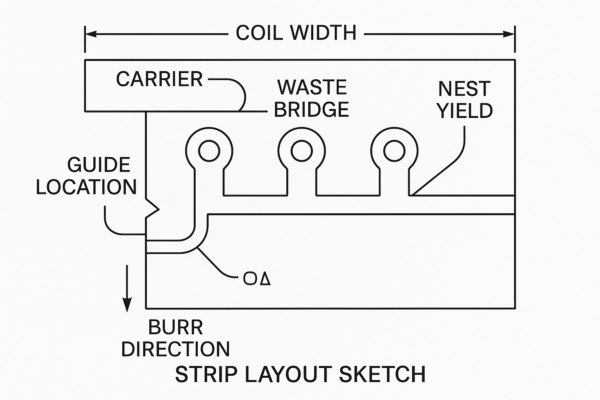
Apply design-for-stamping1 rules to cut 8–18% per part. Reduce pierces, reuse radii, and optimize strip layout2. Choose common grades first. Validate tolerance stacks before cutting steel.
Dive Deeper
I lock cost during drawing review, because late changes burn cash1. So I align bends, pierces, and embosses with feed. I reuse radii and punches across features. Insert count drops, and spares get simpler. I set minimum flange widths2 to match sheet thickness. Edges stay stable, and burrs remain predictable. I move cosmetic faces away from sliding zones. I add lead-ins on tabs and slots. Lines run faster, and jams vanish.
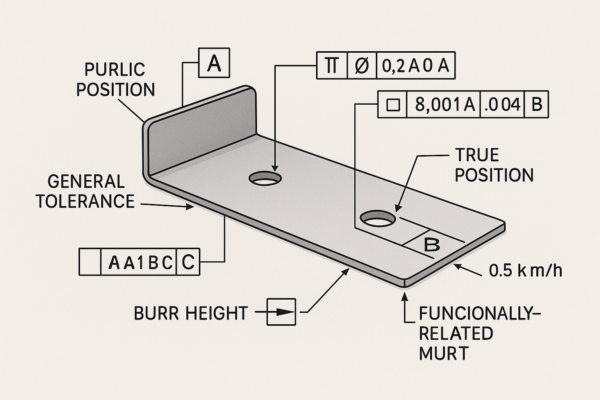
I revisit tolerance stacks1 with function first. I put tight numbers only on true functional faces. Then I open non-critical dimensions by 20–30% after trials. I hold function with clean datums and simple GD\&T. I avoid exotic callouts that spike gauge cost. Scrap falls, and cycle time improves. When pads must be flat, I coin pads instead of grinding the full face. This change removes a secondary step and protects flow.
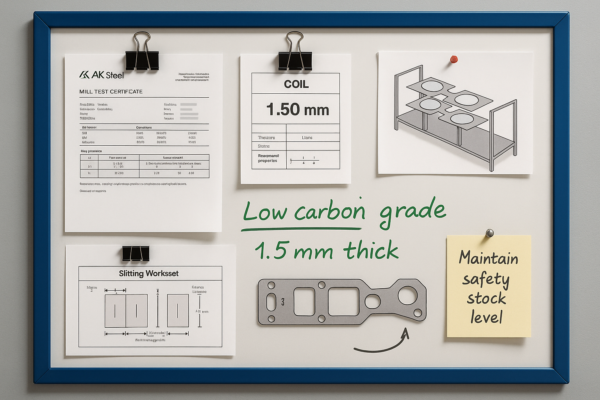
I compare two or three material grades with our card. I test thickness steps with forming simulation1. I search the sweet spot between draw depth, springback2, and die life. I often swap 304 to 201 stainless on non-corrosive covers. Strength stays fine, and material drops 6–12%. I add ribs or hems rather than thicker sheet when stiffness dips. Weight falls, press tonnage eases, and energy use drops.
Prime works as a custom stamping parts supplier1 with in-house simulation and tool design. We sync stamping with CNC parts precision machining2 for tight post-ops. We weld studs and nuts in line when designs need them. You get one drawing, one warranty, and one invoice.
Design-for-Stamping Checklist
- Use standard radii: 0.5–1.0 × thickness.
- Keep hole-to-edge ≥ 1.5 × thickness1, aligned with feed.
- Combine small pierces; add pilot holes early.
- Keep cosmetic faces away from sliding wear zones.
- Add generous lead-ins to reduce mis-assembly2.
Material and Thickness Trade-offs
| Cost lever | Typical impact | Change I make | Notes |
|---|---|---|---|
| Remove 2–4 pierces | 3–7% | Merge slots | Watch heat paths |
| Standardize radii1 | 2–4% | Shared punches | Faster tool build |
| Optimize strip layout2 | 4–9% | Tighter nesting | Lower scrap ratio |
| Add ribs, not thickness | 3–6% | Form features | Keep weight low |
| Widen non-critical tolerances | 2–5% | Revise GD\&T | Fewer reworks |
How do I control tooling cost and lead time without risk?
Late tools derail launches. Surprises wreck budgets. So I break tooling into smart phases1 and modules2.
Split tooling into prototype, bridge, and production. Use modular inserts at wear stations1. Choose progressive or transfer by geometry and volume2, not habit.

Dive Deeper
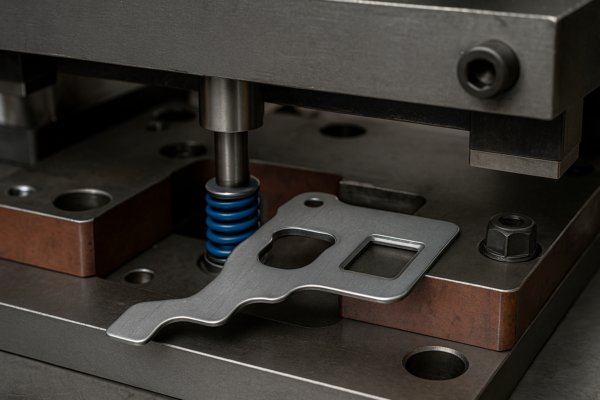
I start with a soft tool or laser blanks plus form blocks. Concepts prove fast, and we see burrs and springback early. Then I build a bridge tool with partial stations and robust pilots. I measure real Cpk1 on holes and bends from those runs. The final progressive die2 then needs fewer corrections. The launch curve stays calm.
I choose progressive for thin sheet and high volume1. I choose transfer for deep cups, large shells, and asymmetric parts. I model both paths with stroke rate, strip pitch, and coil width. Then I size presses and feeders for OEE2, not hope. I leave one or two free stations for future options. Late features do not force a new die.
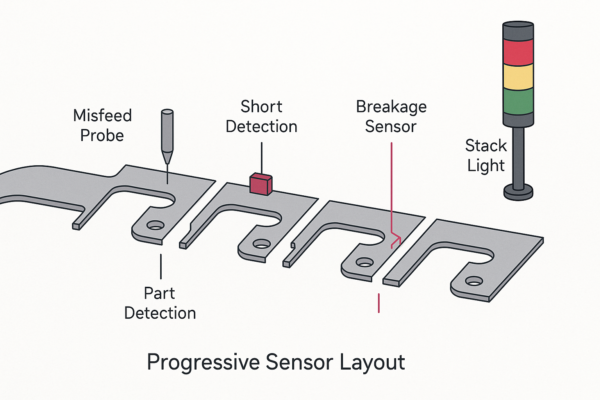
I standardize punch heads and retainers across part families. Quick-change inserts cut downtime to minutes. I add die protection sensors1: misfeed, short stock, and punch break. The press stops before damage. I plan lube delivery and slug removal up front. Galling stays rare, and slugs never stack.
Commercial gates matter as much as steel. I tie payments to design review, steel cut, first tryout, and PPAP1. I set buffers for tool steel, sensors, and ground components. I lock acceptance rules for burr height2 and hole true position. Sign-off stays objective. Schedules stay honest.
Prime runs ten production lines and performs tryouts in-house. Feedback flows fast. We include spare kits in quotes. Upfront 1–2% saves weeks later. We add range by acting as an ISO-certified welding parts manufacturer1 and an ISO certified casting parts manufacturer2. Brackets and housings ship with the stampings.
Tooling Path Options
- Prototype path: laser blanks1, brake forms, quick tryouts.
- Bridge path: partial progressive with hand-off stations.
- Production path: full progressive2 or transfer.
Progressive vs Transfer at a Glance
| Parameter | Progressive | Transfer |
|---|---|---|
| Best for | High volume, thin sheet1 | Deep draws, large shells2 |
| Die cost | Lower to medium | Medium to higher |
| Speed | Very fast | Fast to medium |
| Flexibility | Lower | Higher per station |
| Handling | Strip-fed | Pick-and-place |
Hidden costs lurk in rejects, overtime, and freight claims. I attack quality at the source and in the box.
Run SPC on key dimensions. Lock fixtures to datums. Standardize packaging to ISTA tests.1 Plan shipments for demand swings.2

Dive Deeper
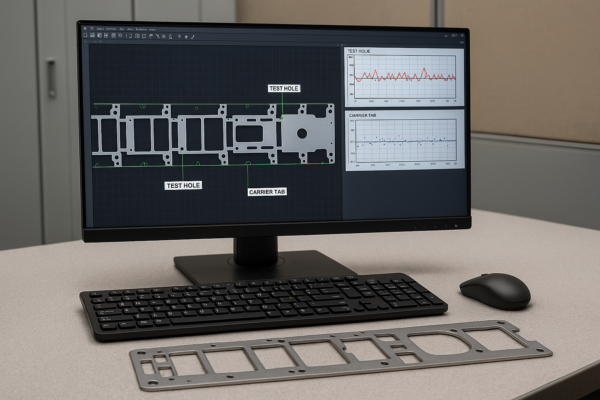
I set Critical-to-Quality features1 at contract time. I assign gauges and sampling plans. I publish control charts2 for hole size, flatness, and springback. Trends show early, and we fix shifts before scrap grows. We run ISO procedures on all lines. Job aids at the station keep checks easy and visible.
I map each process from coil to crate. I remove extra moves and touches. I group presses, weld cells, and inspection close together. I use milk-run feeds1 with kanban. Lines run steady. WIP stays low. I standardize master samples2. Fixtures reference real datums. First-piece approval takes minutes, not hours.
I build the pack from your drawing, not guesses. I select foam dunnage1, edge guards, and VCI paper. I test cartons with ISTA drop and vibration2. I lock pallets with corner boards and straps. Labels show barcodes and QR codes for trace. The last mile then stops dents and rust. Receiving scans fast and smiles.
I protect launches with mixed modes. I split air and sea when gaps appear. I cover the first week by air. I refill by ocean for cost. I use vendor-managed inventory1 for repeat parts. You keep safety stock2 without a huge warehouse. When forecasts shift, I pull from VMI and reset the next lot. Builds keep moving.
Control and Flow Summary
| Control area | What I do | Why it matters |
|---|---|---|
| SPC on CTQs | Live Cpk dashboards | Early trend alerts |
| Incoming metal | Heat lot traceability1 | Stable forming |
| Final inspection | 100% visual + gauge | Zero escapes |
| Packaging | ISTA drop tests2 | No transit damage |
| Logistics | Mixed mode plan | On-time arrivals |

Which material strategies lower scrap and stabilize price?
Material often drives most of the part cost. I squeeze waste and smooth price swings with structure, not luck.
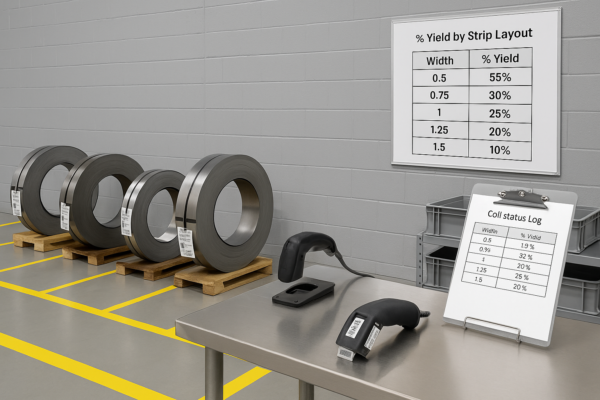
Match coil width1 to the best strip layout. Negotiate MOQ bands2 with flex windows. Approve alternates with tested radii and lube. Split buys to hedge surcharges and currency.
Dive Deeper
I start with a clean strip layout and a target scrap ratio1. I query coil widths across mills and slitters. I rank options by yield2, uptime, and freight. I consider slit lead times and packaging style. I avoid narrow widths that add weeks or premium costs. I track scrap bridges and carrier strength. I check pilot positions. Strip control stays tight while we chase yield2.
I negotiate MOQ bands1 with flex windows. I run short lots during pilots. I scale without penalties during ramp. I lock a price ladder tied to metal indexes. TCO stays steady2 across quarters. I set acceptance specs for coils. I sample lube type and hardness on arrival. Forming stays stable. Rework stays rare.
I respect forming limits when I approve alternates. I trial 201 vs 304 stainless and adjust radii and lube. I test draw beads and blank holder forces. I keep Cpk above 1.671 on key features. When coatings fit, I compare galvanneal vs zinc2. I weigh paint flow, weld needs, and field life. Corrosion risk stays low. Paint lines stay happy.
I remove secondary operations with smart features1. I extrude holes instead of press nuts on non-structural studs. I crimp hems to stiffen flanges instead of thicker stock. I coin pads to create flat mount faces. I avoid milling pads after forming. Cycle time stays short.
I watch currency, fuel, and alloy surcharges. I split buys between two approved mills when risk rises. I stagger price cycles. I keep coil safety stock1 for critical lines. I avoid shutdowns when ships wait offshore. I keep a custom metal stamping China2 backup lane ready. Planners hold leverage and peace of mind.
Yield and Material Playbook
| Lever | Action | Typical impact | Notes |
|---|---|---|---|
| Coil width match | Pick optimal width band | 2–6% | Fewer scrap bridges |
| Alternate grades | Approve with trials | 3–8% | Watch formability |
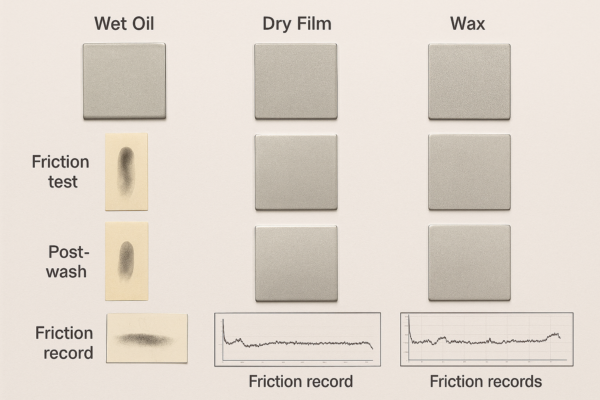
| Lube optimization1 | Switch to dry film | 1–3% | Cleaner assembly |
| Feature redesign | Extrude or hem | 2–5% | Fewer post-ops |
| Price stability2 | MOQ bands + split buys | Risk down | Smoother cash flow |
How do I structure RFQs and supplier management for real savings?
Bad RFQs invite bad quotes. I set clear data, simple gates, and steady feedback to drive TCO down.
Send drawings, CAD, CTQs, EAU bands, and target launch. Request two process routes. Require packaging specs and PPAP timing1. Track response time and change hygiene.
Dive Deeper
I write an RFQ that tells the story. Drawings, CAD, CTQs1, and the PPAP level2 sit together. I add EAU bands and a launch month. I define packaging with ISTA and label rules. Quotes then land apples-to-apples. Teams save days. I ask vendors to flag risks early. We hold a short review call. Noise dies before numbers harden.
I request two routes for complex parts. One route shows progressive. The other shows transfer or a hybrid with post-ops. I see cost sensitivity1 and breakpoints. I align volume, tool cost, and cycle with real demand. I ask for a second material option when formability2 allows. I gain leverage and keep choices alive during supply swings.
I score vendors on response time1 and change hygiene. I track speed and clarity. I require a clean change log2 and a live risk list. Surprises fade, and trust grows. One owner on both sides keeps cadence weekly during tool build and ramp. Issues get fixed before lines starve.
Prime runs a one-stop model for buyers who want fewer vendors. We stamp and machine in-house. We weld studs and brackets when needed. We cast housings as an ISO certified casting parts manufacturer1. We supply kits as a fasteners wholesale supplier2. We mold covers as a plastic parts OEM manufacturer. You receive one schedule and one crate. Your dock team smiles.
RFQ and TCO Scorecard
| Area | What I request | Why it helps | Metric |
|---|---|---|---|
| Data pack | Drawings, CAD, CTQs | Clean quotes1 | First-pass quote rate |
| Routes | Progressive + transfer | Choice & leverage | Cost delta clarity |
| Packaging | ISTA spec + labels | Fewer claims | Damage rate |
| PPAP | Level + timing | Predictable launch2 | PPAP on time |
| Communication | One owner, weekly | Fast fixes | Response time |
How can I optimize total landed cost and logistics plans?
Piece price is not the full story. I plan lanes, duties, and pack density to lower true cost.
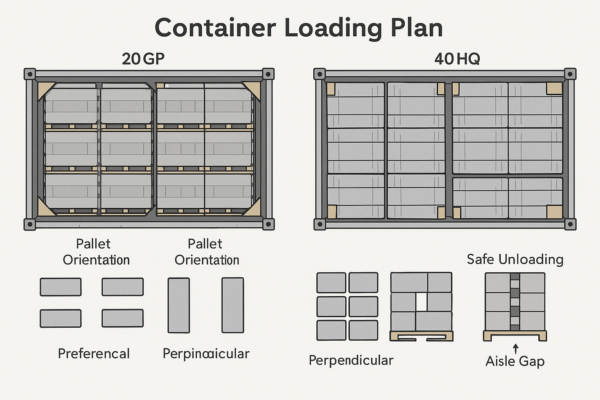
Compare EXW, FOB, CIF, and DDP1 by lane. Tune carton count, pallet stack, and container mix. Use split air-sea for launches and VMI for repeat flow2.
Use a lane model that includes duty, fuel1, port fees, and drayage. Set pack density targets and verify with trial loads. Split modes during ramp to protect SOP. Align forecasts with reorder points. Hold service high and inventory low2.
Dive Deeper
I run a landed cost model1 for each part. I include duty, doc fees, local drayage, and insurance. I add cartons, foam, and labels. These small items add up fast. I push pack density2 without harming quality. I test deeper trays, tighter dunnage, and corner boards. I run ISTA drops and vibration. I log damage rates and compare before and after. Each change must earn its place.
I align Incoterms1 with your risk preference. If you want control, we use EXW or FOB. You run freight with your forwarder. If speed beats control, we ship DDP2. We then own the headaches. You get a clean dock date. I define late-part triggers. We split first-week demand by air and refill by sea. We keep a small emergency buffer.
I build schedules around your S\&OP cycle. I set reorder points from real consumption. Shipments flow on a rhythm. Firefighting stops. I track forecast accuracy1. I tune lot sizes for line rate. I size safety stock by service level, not guess. Inventory then does its job without waste. I share a dashboard for OTD, inventory days, and expedite count. Leaders see wins and gaps fast.
Incoterms and Pack Density Quick Guide
| Option | Buyer control1 | Speed | Cash timing2 | When I pick it |
|---|---|---|---|---|
| EXW | Highest | Medium | Early | You run freight |
| FOB | High | Medium | Medium | Clear port roles |
| CIF | Medium | Medium | Medium | You clear customs |
| DDP | Low | High | Late | You want zero hassle |
Which tolerance and GD\&T choices reduce cost without risk?
Tight numbers feel safe, yet many only add cost. I place precision where function demands it.
Locate datums on functional faces1. Use position for holes and profile for forms. Relax non-critical features2 after proof with samples and data.
Dive Deeper
I meet design teams early and walk through function. I ask what mates, what seals, and what locates. I set datums on those faces. I use position for hole patterns1 and profile for formed edges. Gauges stay simple. Checks run fast. I put surface finish2 on visible faces only. I tie burr height to assembly need, not wish lists.
I create a measurement plan1 that matches takt. Go/no-go pins cover daily checks. CMM handles audits. Fixtures reference true datums. Operators avoid guesswork. Numbers stay repeatable. I track Cpk2 weekly. If Cpk2 holds above 2.0, I relax that feature. Time and money move to tougher points.
I align drawing tolerances with downstream steps. If CNC reams a hole1 after forming, I loosen the formed hole. The ream sets precision, not the die. If welding follows stamping, I account for heat movement2. Tabs or pins hold position during weld. Assemblies fit without shims.
Tolerance Impact Guide
| Feature | Preferred control | Typical check | Cost note |
|---|---|---|---|
| Hole position | True position1 | Go/no-go pins | Fast to verify |
| Edge form | Profile | Snap-fit gauge | Stable flow |
| Flat pad | Coin + flatness | Feeler gauge | Avoid milling |
| Cosmetic face | Roughness only | Visual + rub test2 | Protect what is seen |
| Burr height | Max at edge | Micrometer | Tie to function |
How can automation and sensors raise OEE and cut cost?
Small sensors change outcomes. I add protection and feedback that pay back fast.
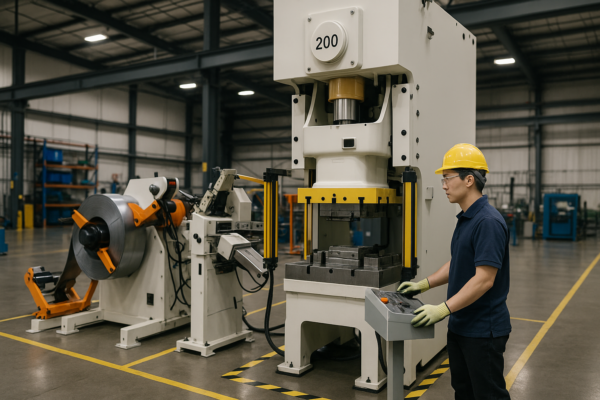
Install misfeed, short-stock, and punch-break sensors1. Add lube monitors and slug detection. Track OEE2 by shift and tool. Fix the big losses first.
Dive Deeper
I map the six big losses with the team. I measure stops, slow cycles, and rejects. I pick sensors that kill the top losses1. I start with misfeed and short-stock probes. I add punch-break sensing on fine pierces. I wire lube pressure switches and flow meters. Crashes drop. Die life grows. I add slug detection2 on deep pierce stations. Double-hit jams stop before damage.
I connect each press to a simple OEE board1. I log availability, performance, and quality by shift. I add a comment field for each stop. Patterns appear within days. I tag chronic stations and run focused kaizen2. I measure before and after. I lock wins with standard work. I repeat each month until OEE crosses 85%.
I automate small moves that waste time. Quick-change bolsters1 and die carts cut changeovers under 20 minutes. Camera checks confirm label presence. Pack errors vanish. Pick-lights2 guide kit cells. Teams pull parts right the first time.
Sensor and Automation Wins
| Device | What it prevents | Typical payback | Notes |
|---|---|---|---|
| Misfeed probe1 | Strip crash | 1–3 months | Save tooling |
| Short-stock switch | Off-pitch hits | 1–3 months | Protect pilots |
| Punch-break sensor2 | Catastrophic damage | 2–4 months | Vital on fine pins |
| Lube monitor | Galling and wear | 2–5 months | Tie to alarms |
| Slug detector | Double hits | 2–5 months | Deep pierces |
| Quick die change | Long setups | 3–6 months | Raise OEE |

Where does sustainability also save real money?
Green choices can cut cost. I target energy, scrap, and chemicals with simple steps.
Lower press tonnage with smarter design1. Switch to dry-film lube and closed-loop washers2. Reuse dunnage safely. Track wins on a visible board.
Dive Deeper
I design ribs and hems to reduce thickness without losing stiffness. Press tonnage falls. Energy drops. I switch select parts from wet oil to dry-film lube1. Wash load and VOCs shrink. I install closed-loop washers2 with oil skimmers. Waste drops. Cleanliness improves. I standardize carton sizes and reuse internal dunnage where rules allow. Protection stays strong with fewer materials.
I manage scrap with better nests and tighter coils. I sell scrap under a contract that tracks markets. Recovery improves when rates swing. I train teams to prevent mixed scrap1. Mills accept higher grades2. I post a board with energy and scrap per 1,000 parts. Teams see progress and chase more.
I share these wins when ESG matters. I provide carbon and water data1 for key parts. I align with your CSR plan2 without noise. Reports stay strong while cost stays low.
Sustainability Playbook
| Action | Cost impact | Quality impact | Notes |
|---|---|---|---|
| Reduce thickness via ribs | Energy down | Stiffness intact | Validate formability |
| Dry-film lube1 | Wash cost down | Clean parts | Not for all grades |
| Closed-loop washer2 | Chemical use down | Better cleanliness | Watch filter life |
| Reusable dunnage | Carton cost down | Safer edges | Track cleanliness |
| Scrap contract | Cash back up | None | Control grade mix |

How should I run engineering changes without chaos?
Changes happen. Chaos does not need to follow. I enforce a simple, fast ECN flow1.
Freeze baselines. Approve risk, cost, and stock plans. Pilot on a short lot. Close with gauges, labels, and clean traceability2.
Dive Deeper
I create a clean baseline with print, CAD, and CTQ list1. I store it in a dated folder. I log change requests with reason and risk. I add cost and timing impact. Owners review and decide with facts. I set a trial lot and a success metric2. The gate stays visible to all.
I mark tools, fixtures, and gauges touched by the change. I update control plans1 and FMEAs2. I print new labels and pack sheets. I run the pilot, measure results, and compare to targets. If results meet plan, I scrap or rework old stock per the purge plan. I switch labels and update ERP. I keep both lots traceable for audits.
I close the loop with a short note showing the learning. I share photos and charts, not walls of text. I post the outcome on the cell board. Operators see what changed and why. I keep a monthly ECN review1. Leaders see cost and quality impact2. Future work gets approved faster.
ECN Gate Table
| Gate | Owner | Output | Go-live risk1 |
|---|---|---|---|
| Request | Engineering | Problem and aim | Low |
| DFM review | Stamping + CNC | Feasible route | Medium |
| Trial build2 | Production | Data and Cpk | Medium |
| PPAP update | Quality | Files + gauges | Low |
| Stock purge | Logistics | Plan + proof | Medium |
| Release | Program | ERP + training | Low |
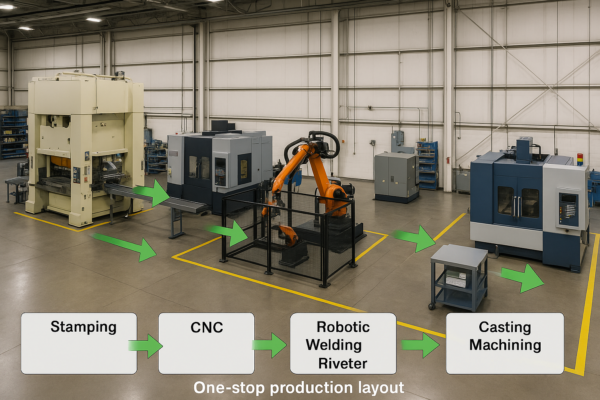
How does Prime’s one-stop model reduce your TCO?
Many vendors add handoffs and delays. I keep the work under one roof and one plan.
Combine stamping, CNC, welding, casting, and plastics in one schedule1. Cut freight legs and buffers. Hold one warranty and one PPAP2.
Dive Deeper
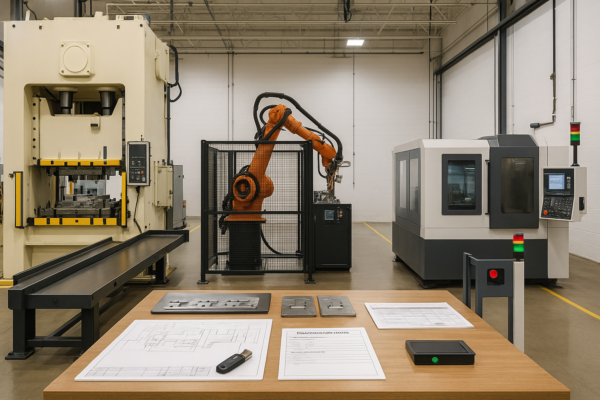
I route parts through our ten lines without dead time. I stamp blanks and hand them to a CNC cell1 for tight holes. I weld studs or brackets in the next bay. I machine cast housings nearby when the assembly needs them. I mold plastic covers for electronics where required. You receive a finished kit2 with one crate and one scan.
I keep one owner for the whole set. I run a single control plan1 that spans cells. I use common labels and pack rules. Inspections feel the same at each gate. I schedule as one, not five. Buffers shrink. Cash turns faster. I negotiate material and hardware as one bundle. Volume leverage improves terms.
Prime operates as an ISO-certified stamping parts factory in China1 with integrated services. We deliver as a custom stamping die design service2 and a progressive die manufacturer China team. We support your kits as a fasteners wholesale supplier and a plastic parts OEM manufacturer. We pair these with CNC parts precision machining for true holes and faces. You buy confidence, not stress.
One-Stop Benefit Matrix
| Process | What we add | Cost effect | Risk effect |
|---|---|---|---|
| Stamping | Stable OEE1 | Piece price down | Fewer escapes |
| CNC | Post-op precision2 | Rework down | Tolerance proof |
| Welding | Studs and brackets | Hardware saved | Fewer joints |
| Casting | Rigid housings | BOM count down | Single PPAP |
| Plastics | Light covers | Assembly speed | Fewer vendors |
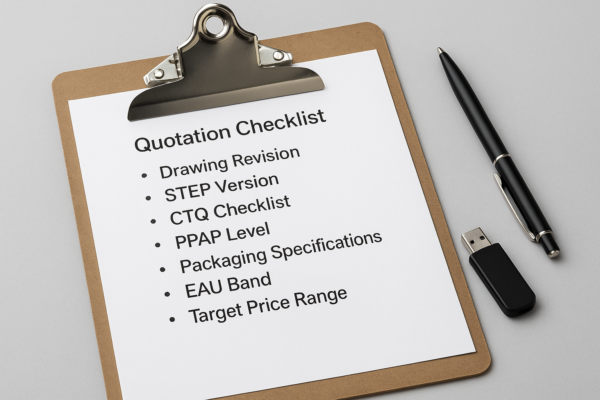
What should I include to get a fast, accurate quote?
Good inputs speed good quotes. I send a tight package and avoid guesswork.
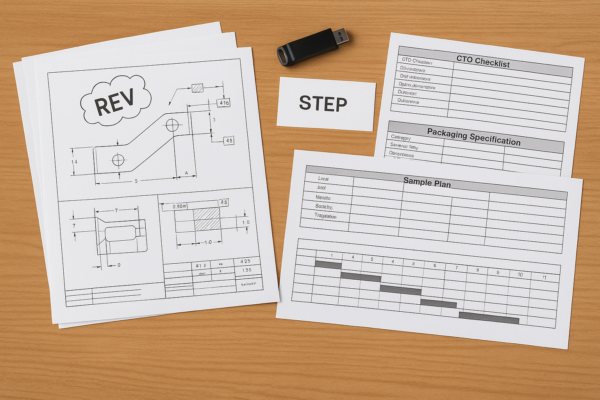
Share drawings, CAD1, CTQs, EAU bands, and target launch. Include packaging rules2 and test needs. Ask for two routes and two materials.
Dive Deeper
I include a clear drawing with revision and date. I add a STEP file that matches the drawing. I mark CTQs1 with symbols and list them in text. I attach the PPAP level2. I specify packaging with ISTA and label rules. I add EAU bands and a launch month. The quote then lands fast and tight.
I request a progressive route1 and a transfer or hybrid route. I also request two materials when formability allows. I see cost maps and breakpoints. I invite small DFM tweaks that save cost. I review proposals with my team. I set a target price window2. Vendors then tune options to the right level.
I align commercial items early. I state Incoterms1, payment terms, and inspection levels. I list special audits or site visits. I add photos of the assembly and neighbor parts. Suppliers see context and risk. I confirm NDA and data rules2. Files stay safe. Trust grows.
Quote-Ready Data Table
| Item | Why it matters | Good example |
|---|---|---|
| Drawing + STEP | Removes guesswork | Rev B, STEP AP214 |
| CTQ list1 | Guides gauges | Hole TP, burr height |
| EAU bands | Die sizing | 50k / 250k / 600k |
| Packaging spec2 | Prevents claims | ISTA 2A, barcode |
| Routes + materials | Gives options | Progressive + transfer; 201 vs 304 |
Cost example: where do the biggest wins come from?
Numbers build trust. I share a simple model with clear levers.
Start with material yield1 and strip layout. Add die path and cycle time2. Finish with pack density and lane plan. Track three levers at once.
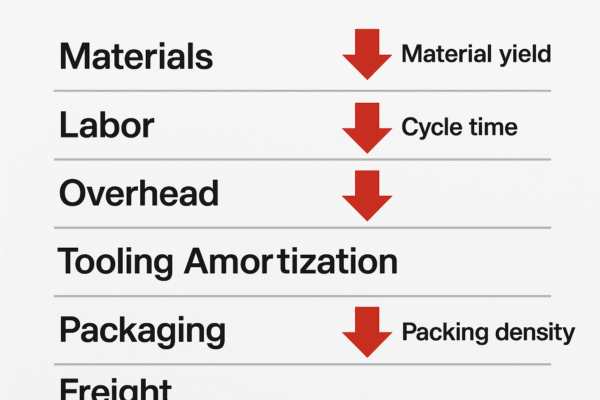
A strip layout change1 can save 5–9% by cutting scrap. A modular die can save 2–4% in maintenance per year. Better pack density2 can cut freight by 8–12% per container. Small wins stack fast and stay stable.
Dive Deeper
I model a 0.8 mm steel bracket at 500,000 pieces a year. I remove one scrap bridge and tune coil width. Yield rises from 78% to 85%. Material drops 7%. I pick a progressive die1 with two spare stations. I add a feature later without a rebuild. I move to dry-film lube2 and a better wash. Rework shrinks. Labor falls 3%.
I raise pack density1 by 15% with deeper trays and corner boards. One more pallet fits each container. Carton damage falls. Freight drops 9%. I split the launch with a small air lot and a sea refill. The line starts on time. Cash impact stays small. Together, these wins show a 12–20% total cut. I can prove similar math on your part.
Sample Cost Lever Table
| Lever | Before | After | Delta |
|---|---|---|---|
| Material yield1 | 78% | 85% | +7 pts |
| Cycle time (s)2 | 0.80 | 0.72 | −10% |
| Scrap rework rate | 1.5% | 0.6% | −0.9 pt |
| Pack density (pcs/pallet) | 3,000 | 3,450 | +15% |
| Freight per 1k pcs | \$48 | \$43.50 | −9% |
Common pitfalls and how I avoid them
Small traps burn cash. I remove them early with simple habits.
Missed CTQs1, vague packs, and weak strip control cause most fires. Clear lists, tested packs, and robust pilots2 prevent them.
Dive Deeper
I list CTQs1 on the RFQ cover and mirror them into the control plan. I add photos of gauges and samples. Nothing hides. I create packaging drawings with foam shape and label format. I run a pilot shipment2 before the launch. Claims drop near zero. I hold a strip control review with pilots and carriers marked. Misfeeds fade. Uptime grows.
I keep revision control1 strict and simple. One active drawing per part. Old files move to the archive. The latest rev prints on each label. I train teams to check the rev at start and after breaks. Mistakes fall fast. I hold a weekly change call2. We close issues before they grow.
Fast Pitfall Checklist
- CTQs posted at the cell.
- Pack drawing approved and tested.1
- Strip layout with pilots reviewed.
- One active rev on file.
- Weekly change call with owners.2
FAQs
What minimum order quantity1 do you support for new stampings?
I support small pilot lots first. I run 300–1,000 pieces on a bridge tool. Then I scale on production dies.
How fast can you quote a complex progressive die part2?
I quote in 48–72 hours with full data. I need drawings, CAD, CTQs, and forecast bands. Then I add tool and piece price.
Do you provide tooling ownership and spare parts plans?
I provide clear ownership terms and a spare kit list. You see inserts, punches, and sensors. Uptime planning gets easy.
Can you manage PPAP and international audits?
I run PPAP levels per request. I share control plans, FMEA, and MSA1. I support audits with ISO files and clean records.
What packaging do you use for delicate cosmetic faces?
I design foam dunnage and film wrap. Faces stay clean and scratch-free. I add edge guards and top boards for safety.
Do you supply matched fasteners and studs?
I supply kits as a fasteners wholesale supplier2. You receive screws, nuts, and studs with parts. Receiving gets simple.
Can you machine tight holes after forming?
I can, and I often do. I combine presses and CNC cells. I hold tight true position1 on finished holes.
How do you protect schedules during port delays?
I split shipments2 and lanes. I send a small air lot first. I refill by ocean and keep builds moving.
Which Incoterms do you support for global buyers?
I support EXW, FOB, CIF, and DDP on request. You pick risk and control. I align freight and customs.
What industries do you serve most often?
I serve electronics, appliances, HVAC, EV, and industrial products. I know compliance rules and tests. I set quality plans early.
Do you offer engineering support for DFM1?
I offer free DFM during RFQ. I mark quick wins on drawings. I return clear notes within days.
Can you handle mixed materials and assemblies2?
I handle steel, stainless, aluminum, and coated stock. I stamp, weld, cast, and machine. I ship assemblies in one crate.
How do you ensure stable quality on repeat orders1?
I lock CTQs and fixtures. I run SPC and maintain gauges. I compare lots against golden samples.
Do you accept customer-specific labels and barcodes2?
I accept them and print them in-house. Your dock scans fast. Your ERP stays clean.
Can you keep designs confidential?
I sign NDAs and control access. Drawings stay protected. Only the core team handles files.
Are you a fit for B2B wholesale1 only orders?
I am a factory that serves B2B only. I quote wholesale lots and ship worldwide. I support scale.
What makes Prime different from a trading company?
Prime runs ten production lines and owns tools. I control quality, lead time, and cost. I stand behind each crate.
Do you ship to North America and Europe with strict labels?
I ship with country-specific labels and documents. Customs clears fast. Docks process without delays.
Can you support Siemens-adjacent electronics brackets and shields?
I support tight brackets and shields. I manage EMI needs and cosmetics. I pack to retail rules.
Conclusion
Reduce total cost with sharp DFM1, modular dies2, stable materials, SPC discipline, tested packaging, smart lanes, and fast change control.
Ready to lock savings and timelines? Contact Prime now. Send drawings and volumes for a free DFM review, quote, and plan. I ship fast and keep quality stable across stamping, CNC, welding, casting, fasteners, and plastics. I support global lanes, strict labels, and tough audits. Bring me your complex builds and tight tolerances. I will turn them into clean, reliable parts that arrive ready to run.
Website: https://primecustomparts.com/
Email: [email protected]
-
Understanding sharp DFM can help you optimize design for manufacturability, leading to cost savings and efficiency. ↩ ↩ ↩ ↩ ↩ ↩ ↩ ↩ ↩ ↩ ↩ ↩ ↩ ↩ ↩ ↩ ↩ ↩ ↩ ↩ ↩ ↩ ↩ ↩ ↩ ↩ ↩ ↩ ↩ ↩ ↩ ↩ ↩ ↩ ↩ ↩ ↩ ↩ ↩ ↩ ↩ ↩ ↩ ↩ ↩ ↩ ↩ ↩ ↩ ↩ ↩ ↩ ↩ ↩ ↩ ↩ ↩ ↩ ↩ ↩ ↩ ↩ ↩ ↩ ↩ ↩ ↩ ↩ ↩ ↩ ↩ ↩ ↩ ↩ ↩ ↩ ↩ ↩ ↩ ↩ ↩ ↩ ↩ ↩ ↩ ↩ ↩ ↩ ↩ ↩
-
Exploring modular dies can reveal innovative ways to enhance production flexibility and reduce costs. ↩ ↩ ↩ ↩ ↩ ↩ ↩ ↩ ↩ ↩ ↩ ↩ ↩ ↩ ↩ ↩ ↩ ↩ ↩ ↩ ↩ ↩ ↩ ↩ ↩ ↩ ↩ ↩ ↩ ↩ ↩ ↩ ↩ ↩ ↩ ↩ ↩ ↩ ↩ ↩ ↩ ↩ ↩ ↩ ↩ ↩ ↩ ↩ ↩ ↩ ↩ ↩ ↩ ↩ ↩ ↩ ↩ ↩ ↩ ↩ ↩ ↩ ↩ ↩ ↩ ↩ ↩ ↩ ↩ ↩ ↩ ↩ ↩ ↩ ↩ ↩ ↩ ↩ ↩ ↩ ↩ ↩ ↩