
Top 10 Cost Reduction Strategies for Custom Metal Parts: How Do We Optimize Every Step?

Many buyers face rising part costs1 because designs, processes, and supply plans2 do not align.
From the first sketch to mass production, I show practical steps that cut 15–30% of total cost. I use DFM1, smart process selection2, and tight supply control. This framework works for CNC, stamping, die casting, and welding projects.
I will guide you through each phase1, so you can act today and see measurable savings2.
How Can Design Optimization Reduce 15–30% Without Sacrificing Quality?
I often see drawings that look elegant but waste money and machine time.
I use DFM1, tolerance grading2, and material substitution to simplify geometry and keep function. These steps reduce cycle time, scrap, and tool wear while quality stays stable.

I start by naming the problem clearly, then I resolve it with simple rules. I show expected savings1 and I verify results with real parts. You get a clean drawing, a faster cycle2, and a lower quote. You also keep performance in every critical fit and interface.
Dive Deeper: A Practical DFM Playbook for Fast Wins
Why I Begin With Function, Not Features
I first map each feature to a function. If a pocket does not improve fit, I remove it. If a rib does not add strength, I thin or delete it. I also merge features when I can. So I reduce setups and cutter changes. Then I reroute toolpaths1 with larger radii and standard inserts. This reduces machining minutes2 and extends tool life.
How I Grade Tolerances Without Risk
I split dimensions into three groups: critical, important, and reference. I hold tight limits on sealing faces, bearing seats, and alignment datums. I relax non-critical edges, cover flanges, and cosmetic surfaces. So machines run faster, gauges move quicker, and inspection stays simple. Parts still fit, and quality teams1 see fewer red tags.
Where Material Substitution Makes Sense
I replace 304 stainless with 6061-T61 when corrosion is mild. I use zinc alloy or ADC12 in die casting2 to merge parts into one body. I choose DC01 or SPCC for stamping when toughness demands are moderate. I also specify coatings by need, not habit. So I keep strength, but I remove waste.
Cost Focus Table — Design Phase
| Topic | Typical Trap | My Cost-Smart Fix |
|---|---|---|
| Internal corners | Sharp, tiny radii | Use larger radii; match standard end mills |
| Pocket depth1 | Deep cavities across the part | Reduce depth; use ribs; switch to casting for volume |
| Hole sizes | Custom diameters | Use standard drills; unify hole families |
| Tolerance policy2 | Tight everywhere | Grade by function; tighten only where needed |
| Material default | Stainless by habit | Swap to aluminum, zinc alloy, or cold-rolled steel with proper coating |
| Feature count | Many small, isolated cuts | Merge features; reduce setups and tool changes |
Keywords used naturally: CNC parts precision machining1, custom stamping parts supplier2, ISO-certified casting parts manufacturer, Customized stamping parts supplier, CNC parts precision machining1.
Which Process Path Delivers the Lowest Unit Cost for Your Structure and Batch?
I never pick a process by habit. I match geometry, tolerance, and batch to the best path.
CNC suits flexible, low-volume work.1 Stamping wins on flat shapes at scale. Die casting shines on complex forms at mid-to-high volume.2 Welding suits frames and assemblies.
I compare cycle time1, tooling cost2, and yield risk side by side. I also watch unit cost trend as batch grows. Then I pick a single process or a hybrid flow. You get the lowest total cost and a stable schedule.
Dive Deeper: A Simple, Honest Framework for Process Choice
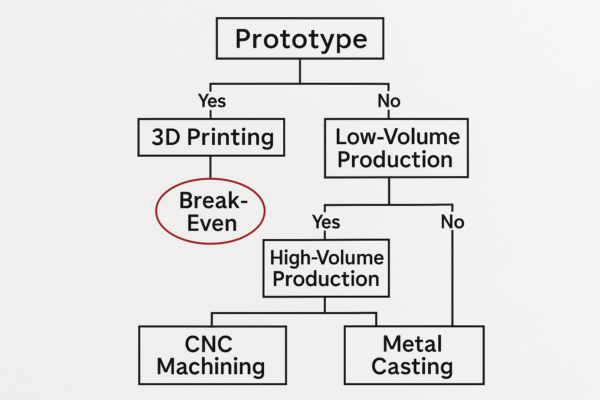
Step 1: Score the Geometry
I rate wall thickness, draft, fillets, ribs, bosses, and hole families. If the part is flat and thin, stamping likely wins beyond 1,000 pieces. If the body is thick and complex, die casting1 becomes attractive from 1,000 to 50,000 pieces. If the part carries tight local tolerances or dynamic features, I keep CNC2 for those faces only. Welding solves frames, brackets, and modular structures that would be wasteful to machine.
Step 2: Check the Volume Ladder
I run a five-rung ladder: 1–10, 10–100, 100–1k, 1k–10k, 10k+. I compare total landed cost1 at each rung. I include tooling, NRE, cycle time, scrap, rework, and packaging. So we see the real break-even point2. This avoids a common trap where CNC looks cheap early but punishes you after scaling.
Step 3: Consider a Hybrid Flow
I often combine processes. I die cast1 the main body to get shape economy. Then I finish critical bores with CNC2 to hold IT7 or better. Or I stamp shells and then spot weld or rivet to assemble. Sometimes, I weld a frame, then machine interfaces. This hybrid approach gives the best of both worlds.
Process Selection Matrix
| Process | Sweet Spot Use Case | Batch Range | Setup Cost | Unit Cost Trend | Notes |
|---|---|---|---|---|---|
| CNC | Complex prototypes; tight local tolerances1 | 1–500 | Low | High | Best for fast iteration and final finishing |
| Stamping | Flat, thin parts; brackets, covers, shields2 | 1,000+ | High | Very low | Requires dies; huge savings at scale |
| Die casting | Complex 3D bodies; merged parts | 1,000–50,000+ | Medium | Low | Add small CNC ops on critical faces |
| Welding | Frames, box structures, sub-assemblies | 50+ | Low | Medium | Jigs control distortion; robotic welding raises FTY |
Extra tip: Do not freeze a CNC-only mindset1. Shift as volume grows. Then lock savings in with hybrid finishing2.
How Do We Coordinate MOQ, Standard Parts, and Lead Time to Reduce Overall Cost?
Even perfect designs burn money if procurement fights the plan.
I negotiate flexible MOQ1, I standardize fasteners, and I align volume with rolling forecasts2. This avoids dead stock, rush fees, and hidden logistics losses.

I also plan packaging, pallets, and route options1 early. So shipments move on time, with less damage and fewer claims. You gain stable landed cost2 and clean paperwork.
Dive Deeper: A Buyer’s Playbook for Leaner Purchasing
I. Nail the MOQ Conversation With Data
I walk into MOQ talks with twelve-month volume, a ramp plan, and drop points. I request a batch window1 instead of a hard number. So I mix releases across weeks but keep a steady line load. I pair this with a price ladder2 tied to triggers. Suppliers see predictability, so they agree to flexibility.
II. Standardize the Small Stuff That Breaks Schedules
I switch custom screws to DIN or ISO families1. I unify head styles. I lock thread classes and plating options. So I can pull from regional stock if a lane fails. Prime keeps bulk pools of common fasteners2, inserts, and pins. This avoids week-long delays from niche hardware.
III. Build a Light, Rolling Stock Strategy
I set a buffer on A-parts with known demand. I use vendor-managed inventory1 or a simple call-off. Prime can hold 30–40% buffer on approved projects2. We ship partials in five days, then refill the buffer. So I flatten peaks, protect cash, and hit season windows.
Procurement Optimization Table
| Area | Risk Without Plan | My Countermeasure |
|---|---|---|
| MOQ | Cash strain; excess stock | Batch windows; price ladders; ramp plan |
| Fasteners1 | Long custom lead times | DIN/ISO standards; pooled stock; alternative suppliers |
| Inventory2 | Stockouts and air freight | Buffer targets; VMI; scheduled call-offs |
| Packaging | Transit damage and returns | Export-grade foam, VCI, corner guards, wrap, and crate |
| Routing | Hidden fees and delays | Early route quote; INCOTERMS clarity; customs document check |
Keywords used naturally: custom stamping parts supplier1, welding assemblies supplier, industrial hardware one-stop provider, ISO-certified casting parts manufacturer2, Suppliers of customized stamping parts.
How Do Surface Treatment, Fixtures, and First-Time Yield Drive TCO to the Floor?
Pretty finishes, sloppy fixtures, and late inspections destroy margins fast.
I set finishes by function, I design rigid jigs, and I push checks upstream. So I boost FTY above 95%1 and drive rework and scrap near zero2.
I also calculate the real cost of “cheap” finishing1 or reused fixtures. Those shortcuts add delay and claims. I prefer a clean, stable process2 that ships right the first time.
Dive Deeper: Quality by Design, Not Post-Hoc Correction
Surface Treatment by Use, Not Habit
I pick anodizing for aluminum parts1 that need wear and corrosion resistance. I choose zinc-nickel plating for steel2 when salt spray matters. I use powder coating when cosmetics and durability both count. I skip premium finishes where hidden. So I pay only for needed protection and look.
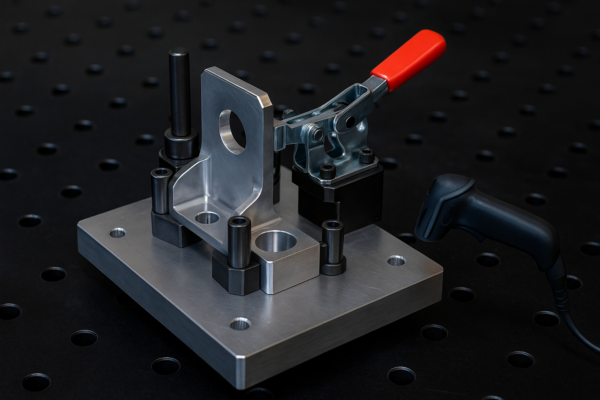
Fixtures That Hold, Align, and Repeat
I design welding and stamping jigs1 with solid locators, hardened pins, and quick clamps. I add heat paths and restraint points to tame distortion. I set datum references2 that match CMM plans. As a result, operators load once and get repeatable results. Robots also benefit from consistent holds and paths.
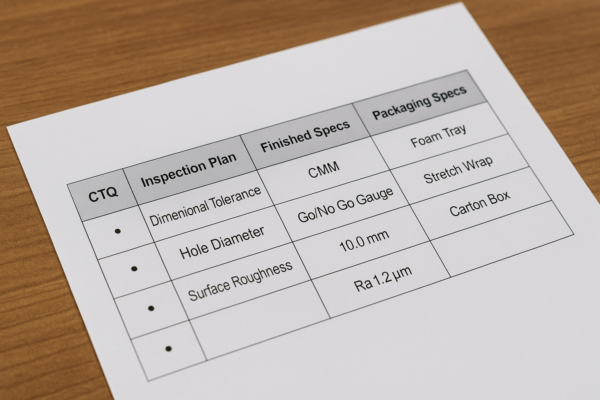
Inline Checks That Prevent Costly Surprises
I do a first-article review and then convert results into simple Go/No-Go checks1. I set hour-based audits for critical dimensions. I trend data on SPC charts2. I fix drifts before parts fail. I also sample finishes per lot to catch bath or powder issues. So lines keep moving, and shipments pass inspections.
Quality to Cost Table
| Topic | Common Shortcut | My Standard Practice |
|---|---|---|
| Finish selection | Cosmetic overkill | Function-led finish spec with test plan |
| Welding accuracy1 | Loose, reused jigs | Custom fixtures; heat control; robotic paths |
| Inspection timing2 | Final-only checks | Incoming, in-process, and final checks aligned to CTQs |
| FTY result | 80–88% | 95%+ with jigging and SPC |
| Rework and scrap | Hidden in overhead | Exposed and attacked at source |
Keywords used naturally: CNC parts precision machining1, ISO certified foundry parts manufacturer2, custom stamping parts supplier, precision welding assemblies supplier, first-time yield improvement.
What Are the 10 Proven Levers That Cut Total Cost Consistently?
I rely on ten levers. Each one reduces waste and risk. Together, they transform the P\&L.
I apply them in order, and I review results at each gate. Then I lock gains with documents and fixtures.
- Map functions first, then remove non-functional features.
- Group tolerances by function, not by habit.
- Substitute materials with data sheets and tests.
- Choose the lowest-cost process1 for shape and batch.
- Consider hybrid flows with local CNC finishing.
- Negotiate MOQ with rolling forecasts and triggers.
- Standardize fasteners and inserts to ISO/DIN families.
- Plan buffer stock and schedule call-offs early.
- Pick finishes by use; avoid hidden cosmetic upgrades.
- Build rigid fixtures and move checks upstream.
Unit Cost and Volume Snapshot
| Volume Tier | CNC-Only Unit Cost | Hybrid Unit Cost | Best Path Suggestion |
|---|---|---|---|
| 10–50 | High | High-Medium | CNC prototype; refine DFM1 |
| 100–500 | High | Medium | Hybrid CNC; prep for casting/stamping |
| 1,000–5,000 | High | Low | Stamping or die casting + light CNC |
| 10,000+ | High | Very Low | High-cavitation dies; automated welding2 |
How Do I Benchmark and Measure Savings From Day One?
I do not rely on vague claims. I prove savings with transparent math1.
I baseline the current drawing, process, and quote. Then I track deltas at each change. I also share a one-page scoreboard2.

I include cycle time1, setup count, tool life, scrap rate2, FTY, finish cost, packaging cost, and freight. I show the trend week by week. You see savings build and stick.
Dive Deeper: A Simple Scoreboard That Drives Decisions
The Inputs I Standardize
I lock the cycle time estimate1 per feature set. I freeze machine hourly rates by class. I set a scrap baseline2 by process. I normalize logistics by route and INCOTERM. Then I compare apples to apples.
The Outputs You Need to See
I report unit cost, total run cost, and landed cost1. I also show variance bands2. I tag each gain to a lever, like DFM or fixture upgrades. So teams see which change paid off.
The Cadence That Keeps It Real
I review the board each week during pilots, then monthly in mass production1. I keep targets live. So we maintain gains when engineering changes2 come.
Scoreboard Fields
| Metric | Why It Matters | How I Influence It |
|---|---|---|
| Cycle time1 | Direct unit cost driver | DFM, toolpath, process choice |
| Scrap rate2 | Hidden cost and delay | Fixtures, SPC, early checks |
| FTY | Lead time and claims | Jigging, program control, training |
| Finish cost | Adds up fast across volume | Function-led finish spec |
| Packaging | Damage prevention, brand trust | Export-grade pack, drop tests |
| Freight | Volatile, affects landed cost | Mode mix, route plan, consolidation |
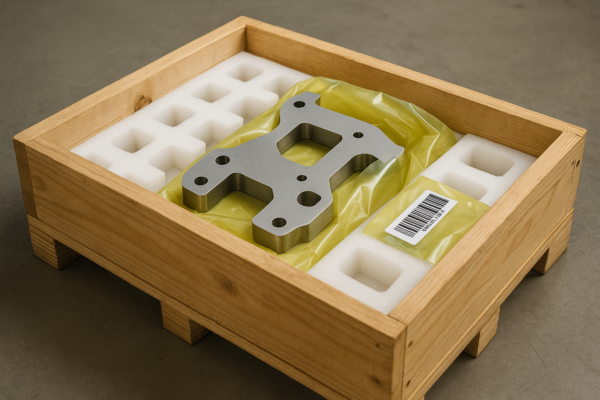
How Should I Design Packaging to Protect Parts and Lower Claims?
Damage in transit ruins margins and customer trust.
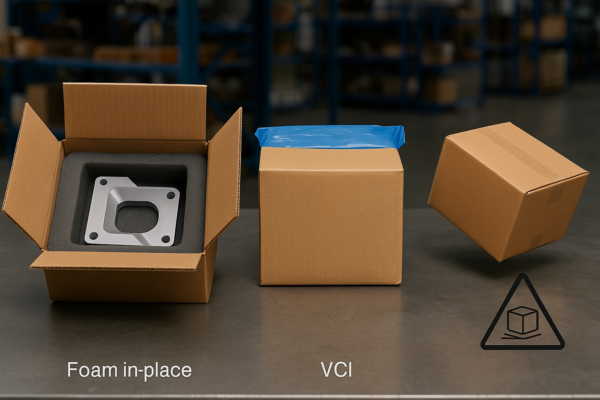
I design packaging1 with the same rigor as the part. I use foam, VCI, corner guards, strong cartons, and ISPM-15 crates2. I print clear labels and handling icons.

I also run drop and vibration tests1. Then I record photos before sealing2. So claims drop, and receiving moves faster.
Dive Deeper: A Practical Packaging Bill of Materials
Pack Architecture by Part Type
Flat stampings stack with slip sheets1 and edge guards. Machined parts sit in foam trays with cavity IDs. Coated parts get VCI and scratch guards2. Weldments anchor to blocks to prevent rub points. So surfaces stay clean and dimensions stay true.
Labeling and Traceability
I place barcodes, lot numbers, and QC stamps. I include packing lists1 in pouches. I also add QR codes2 to manuals and torque specs. Receiving teams scan and store records within minutes.
Logistics and Cost Balance
I optimize carton dimensions for pallet patterns1. I avoid void space that triggers volumetric charges2. I match crate count to container capacity. So we balance protection and total freight.
Packaging BOM Example
| Layer | Material/Spec | Purpose |
|---|---|---|
| Direct wrap | VCI bag + desiccant | Corrosion control1 |
| Cushion | Die-cut foam tray | Surface protection and location2 |
| Interlayer | PE film + anti-scratch sheet | Rub prevention |
| Outer carton | Double-wall 5-layer | Compression and stacking strength |
| Pallet/Crate | ISPM-15 treated wood | Export compliance and stability |
| Labels | Barcode + QR + handling icons | Traceability and safe handling |
How Do I Communicate Requirements So Suppliers Deliver Right the First Time?
Bad communication creates delays, rework, and tension.
I write short, exact specs1 that use simple language. I attach drawings, CAD, CTQs, inspection plans, finishes, and packaging. I list acceptance criteria2 and photos.
I also set one channel for change control1. So nothing gets lost, and timelines hold2.
Dive Deeper: The One-Page Supplier Kickoff Sheet
What I Include Every Time
I define material, heat treatment1, hardness, finish, critical dimensions, and gauge types. I attach test methods and sample photos. I add torque specs where needed. I list packing layouts and label templates. Then I specify INCOTERMS2, ship mode, and contacts.
How I Keep It Short and Clear
I use bullets and tables1. I avoid jargon and long sentences. I number images and cross-references2. So teams follow steps without confusion.
How It Reduces Total Cost
Suppliers quote faster and plan better. QA sets checks early. Packaging teams prepare the right foam. Logistics books space sooner. So we avoid rush fees1, rework2, and claims.
Kickoff Checklist (Abridged)
| Section | Item | Status |
|---|---|---|
| Drawing/CAD | PDF + STEP + DXF | ☐ |
| CTQs | Datum A/B/C + tolerance table1 | ☐ |
| Finish | Spec + test standard | ☐ |
| Inspection | Plan + gauges + sampling | ☐ |
| Packaging | BOM + layout + labels | ☐ |
| Logistics | INCOTERMS2 + route + docs | ☐ |
How Do I Plan Ramp-Up From Prototype to Mass Production Without Surprises?
Ramps fail when teams jump straight from prototype to full tilt.
I plan pilots, PPAP-style runs1, and controlled build lots2. Then I freeze process windows and document golden samples.
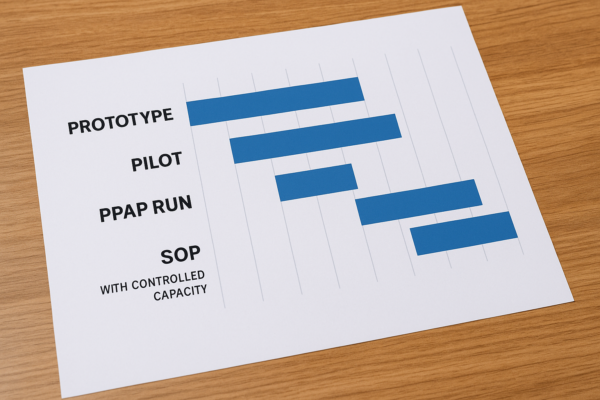
So lines stabilize, supply chains1 prepare, and quality holds2 when volume rises.
Dive Deeper: A Ramp Plan That Actually Works
Stage 1: Prototype and DFM Loop
We use CNC prototypes1 to learn. We measure parts, update drawings, and re-run. We finalize CTQs2 and finishes. We also do pack trials to protect surfaces early.
Stage 2: Tooling and Pilot
We build dies or molds. We run pilots on production machines and fixtures. We verify FTY1, cycle, and scrap. We refine jigs, programs, and SPC points. We also complete gauge R\&R.
Stage 3: PPAP-Style Validation
We run a validation lot1. We submit samples, capability data, and pack photos. We sign off golden samples and control plans. Then we release SOP2.
Stage 4: Controlled Capacity Increase
We scale with buffer stock1 and firm orders. We keep the scoreboard live. We hold a weekly review2 for eight weeks. Then we widen the window as data supports it.
Ramp Milestone Table
| Milestone | Output | Owner |
|---|---|---|
| Prototype loop | Updated DFM + revised drawing | Engineering |
| Pilot run1 | FTY > 95%, cycle confirmed | Production |
| Validation lot2 | PPAP pack, capability report, golden sample | QA + Supplier |
| SOP | Controlled plan, buffer set, live scoreboard | PMO |
How Do I Choose Between Competing Quotes Beyond Unit Price?
Unit price hides surprises that hurt later.
I compare total landed cost1, yield risk2, tooling life, pack quality, and response time. I also weigh communication clarity and change control.

This broader view protects margins1 and delivery windows2.
Dive Deeper: A Fair, Hard-Nosed Quote Comparison
True Landed Cost
I include unit price1, tooling amortization, pack cost, freight, duties, bank fees, and forecasted rework. I also add a risk buffer2 for low FTY histories.
Capability and Capacity
I check machine lists, fixture depth1, and staff skill. I ask for past run rates2 and uptime. I review finish partners and lab reports. So I know if they can deliver on time.
Communication and Control
I test email response, document quality1, and language clarity2. I check whether they track revisions. I also ask who signs off on changes. Good control avoids hidden chaos.
Quote Decision Table
| Factor | Weight | Supplier A | Supplier B | Supplier C |
|---|---|---|---|---|
| Landed cost1 | 35% | |||
| Yield risk2 | 20% | |||
| Capacity fit | 15% | |||
| Pack/Logistics | 10% | |||
| Response/Control | 20% |
Frequently Asked Questions
Do you support low MOQs for engineering builds1?
Yes. I plan phased batches and hold small buffers to protect schedules.
Can you help me switch from CNC to stamping or casting2?
Yes. I review the model, test a pilot, and deliver a hybrid plan if needed.
How fast do you quote?
I usually send quotes1 within 24–48 hours with risks and savings called out.
What files2 do you accept?
STEP, IGES, DXF, DWG, PDF, and native SolidWorks files2 work well.
Do you hold ISO certifications?
Yes. Our lines follow ISO 90011. We also support material and finish certifications.
Can you handle surface treatments2 in-house?
Yes. We provide anodizing, powder coating, zinc-nickel, and more through audited lines.
What is your typical lead time1?
Standard orders ship in 7–25 working days, depending on process and volume.
How do you protect parts in transit?
We use export-grade packaging2 with VCI, foam trays, and ISPM-15 crates as needed.
Can I visit or audit the factory?
Yes. You can visit or schedule a live video audit1 with third-party inspectors2.
Which markets do you serve most?
We ship to North America, Europe, the Middle East, Australia, and global regions.
Conclusion
Smart design, process choice, supply planning, and quality control cut cost without risk while delivery stays fast and stable.
Ready to reduce your cost on CNC parts, stamping parts, casting parts, welding assemblies, fasteners, and plastic parts?
I represent Shandong Prime International Trade Co., Ltd. (Prime), founded in 1993, with 10 production lines, ISO certification1, and 20+ years of one-stop experience in metal components. I deliver flexible customization2, rapid lead times, and consistent quality to global buyers.
Contact us now for a free DFM review, a precise quote, and a tailored plan.
We act fast, we communicate clearly, and we ship on time.
Website: https://primecustomparts.com/
Email: [email protected]
-
Understanding ISO certification can help you ensure quality and reliability in your suppliers. ↩ ↩ ↩ ↩ ↩ ↩ ↩ ↩ ↩ ↩ ↩ ↩ ↩ ↩ ↩ ↩ ↩ ↩ ↩ ↩ ↩ ↩ ↩ ↩ ↩ ↩ ↩ ↩ ↩ ↩ ↩ ↩ ↩ ↩ ↩ ↩ ↩ ↩ ↩ ↩ ↩ ↩ ↩ ↩ ↩ ↩ ↩ ↩ ↩ ↩ ↩ ↩ ↩ ↩ ↩ ↩ ↩ ↩ ↩ ↩ ↩ ↩ ↩ ↩ ↩ ↩ ↩ ↩ ↩ ↩ ↩
-
Exploring flexible customization can reveal how it enhances efficiency and meets diverse client needs. ↩ ↩ ↩ ↩ ↩ ↩ ↩ ↩ ↩ ↩ ↩ ↩ ↩ ↩ ↩ ↩ ↩ ↩ ↩ ↩ ↩ ↩ ↩ ↩ ↩ ↩ ↩ ↩ ↩ ↩ ↩ ↩ ↩ ↩ ↩ ↩ ↩ ↩ ↩ ↩ ↩ ↩ ↩ ↩ ↩ ↩ ↩ ↩ ↩ ↩ ↩ ↩ ↩ ↩ ↩ ↩ ↩ ↩ ↩ ↩ ↩ ↩ ↩ ↩ ↩ ↩ ↩ ↩


2 Responses
Your blog is a testament to your dedication to your craft. Your commitment to excellence is evident in every aspect of your writing. Thank you for being such a positive influence in the online community.
I have read some excellent stuff here Definitely value bookmarking for revisiting I wonder how much effort you put to make the sort of excellent informative website