Top Cost Factors of Custom Welding Parts Manufacturing: A Practical Guide?
I watch buyers guess welding prices[^1]. They look at part size, not weld volume[^2]. That guess kills margins and trust.
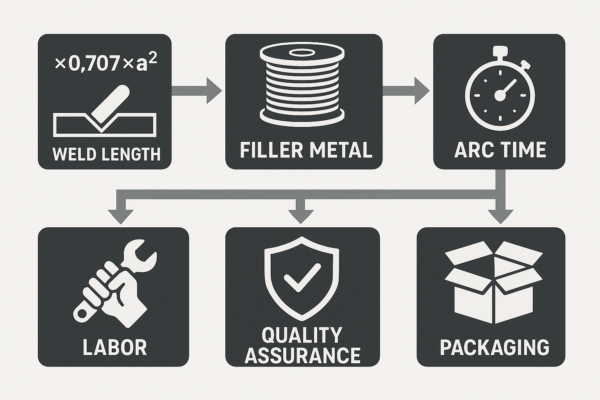
Welding cost comes from weld volume[^1], deposition rate[^2], and time. I multiply weld length by 0.707×a² for fillet volume, convert volume to filler mass and arc time, then add labor, QA, logistics, and packaging.
I wrote this guide to stop the guessing. I share the math I use on the floor at Prime. I show how I plan preheat, passes, QA, and export crates. If you want hands-on support, send your drawings through our Welding Parts page or the Contact form. We will price the weld, not the hope.
Material Type and Thickness: How They Influence Welding Costs?
A small part can cost a lot. Thick steel and long fillets turn a “small” job into a long shift.
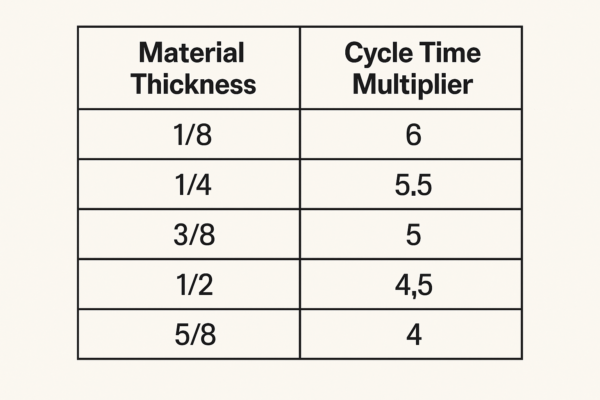
Material sets heat, passes, wire, gas, and distortion risk. Every +1 mm of section thickness often adds 12–18% cycle time[^1] due to preheat, extra passes, and interpass control. High-strength alloys add more minutes and consumable cost.
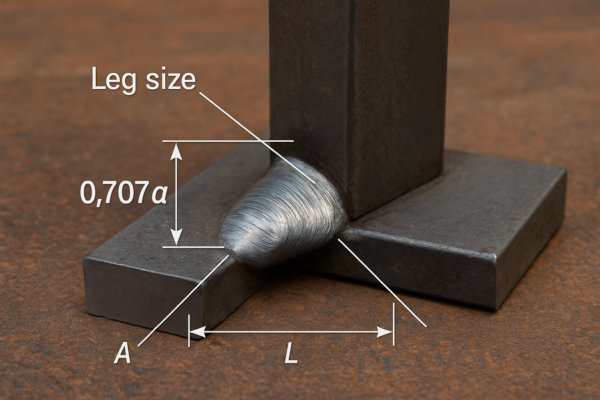
I start with geometry, not a hunch. For a fillet with leg size a, the effective throat area[^1] is 0.707×a². I multiply by weld length for volume, multiply by density for mass, then divide by the process deposition rate to get arc-on time. I divide by realistic arc utilization[^2] to get total minutes. One jump from a = 6 mm to a = 10 mm nearly triples filler mass for the same length, so time climbs fast. TWI notes that small gains in throat thickness drive a large rise in deposited metal because area scales with the square of size—this is why oversizing fillets explodes cost.
Material families change the slope. Mild steel[^1] is forgiving. Stainless[^2] needs cleaner prep and slower travel to control tint and distortion. Aluminum sinks heat and needs tight fit and feeding. HSLA can require preheat and tighter interpass windows.For acceptance language, I anchor to ISO 5817 quality levels and write them into the RFQ so price and quality move together.
If you want my inspection templates and acceptance language, see our Quality Control page; it shows how I tie weld maps, fit-up checks, and sampling plans to our ISO system.
Welding Techniques and Labor Skill Requirements?
A cheap wire with slow travel is not cheap. A fast machine in weak hands is not fast. The fit must match the job.
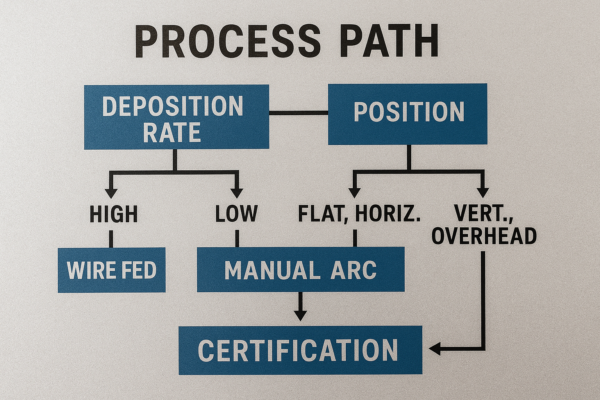
I match process to deposition rate[^1] and skill. MIG[^2] often runs 4–8 kg/h. TIG sits near 1–2 kg/h. Laser and PAW can run fast with minimal cleanup. Position work and code stamps add clear premiums.

I choose process with numbers. I compute filler mass per meter[^1] from 0.707×a², then pick a process that deposits that mass in the target time. Published job knowledge from TWI places MAG/GMAW deposition[^2] from roughly ~1–8 kg/h depending on wire size and current—my shop ranges align with that. TIG sits lower, which is why TIG minutes dominate price unless the bead is visible or heat input must be very low.:contentReference
I write premiums up front: +10–25% time for vertical/overhead, +15–35% for 5G/6G pipe, +10–20% for tight access. If code applies, I add costs for procedure/welder quals per AWS D1.1:2025[^1] or ASME Section IX[^2]. I keep the math transparent so buyers see why minutes matter more than wire price.
If you need a blended plan—TIG on cosmetic seams, MIG on hidden ones—tell me in the RFQ. Our Welding Parts page shows when I mix processes to protect looks and lead time.
Production Volume, Automation, and Equipment Investment?
I love robots. I do not buy one for a 50-piece job. A strong jig can beat a robot for small batches.
Below 150–200 pieces per run, modular fixtures[^1] often win. Above that, a well-designed cell with honest OEE[^2] wins. I set break-even by the saved labor minutes per part against the cell’s monthly cost.
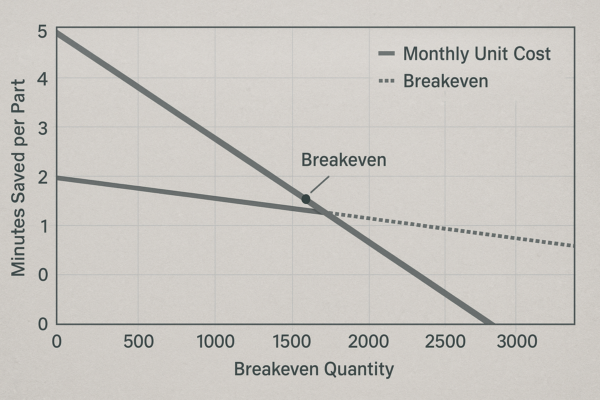
I model three options: manual, semi-auto, and robot. I use realistic OEE[^1], not dreams. Month 1 I assume ~0.45, month 3 ~0.60, month 6 ~0.65–0.70. I include fume extraction[^2], safety, tip dressers, fixtures, and programming in the monthly cost. The decision is a math line: *V = C_month ÷ (R × (T_m − T_r))**. If volume is lumpy, I stick with jigs and great welders. If volume is steady and designs freeze, I move to a cell.
I front-load fixturing because it saves the most minutes. I define datums, clamp near heat, keep torch access clear, and add poka-yoke. When volume tips, I reuse the locator scheme in a robot cell and keep programs stable. See our Case Studies and Innovative Matching Solutions to see how that rollout feels in the real world.
Post-Weld Treatments, Quality Control, and Packaging Expenses?
I once shipped perfect frames in weak crates. The welds were fine. The corners were crushed. I do not repeat that mistake.
Budget 10–20% of total for post-weld steps[^1], QA, and export-grade packaging[^2]. Include grinding, blasting, passivation, machining, NDT, flatness rework, and protective packing. These steps prevent claims and rush air shipments.
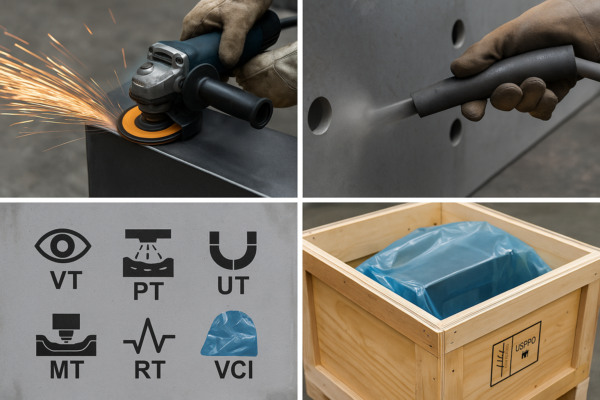
I split cost into surface, geometry, proof, and protection. Surface includes grind/brush/passivate/blast. Geometry includes straightening, stress relief, post-machining. Proof includes VT, PT, MT, UT, RT per ISO 5817[^1] level or AWS D1.1[^2] acceptance. Protection is packaging tuned to route.
I spec ISPM-15 stamped wood for export and add VCI and desiccant for steel. When needed, I validate packs with ASTM D4169 or ISTA 3A.
If you want to see how I tie weld maps, sampling plans, and pack specs to our QMS, browse Quality Control and After-Sales Care.
Joint Design and Weld Symbols: Do They Change Cost?
A drawing can double cost with one symbol. The joint makes the minutes. The minutes set the price.
Yes. Joint type[^1], prep angle, root gap, and symbol details drive filler mass[^2], access, and passes. Intermittent fillets and smaller, repeatable sizes save money when engineering approves.
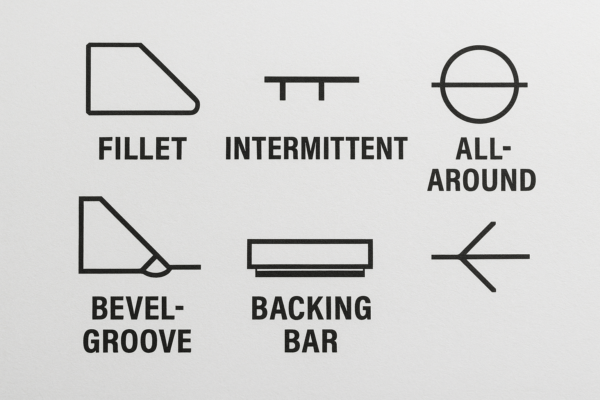
I review joint design before quoting. I replace “all-around” fillets with stitched seams[^1] if loads allow. I adjust bevel angle to cut volume when penetration allows. I anchor symbols to ISO 2553[^2] so both teams read the same language; the standard was updated to unify symbol systems, which reduces errors and emails.For practical symbol use and sizing, TWI’s job-knowledge notes are useful quick references for your engineering team.
For internal education, I link buyers to our Blog articles where I show symbol tweaks that removed 10–20% cycle time without risk.
Distortion Control and Fixturing Strategy: Can Heat Management Reduce Rework?
Heat bends metal. A pretty bead can warp a frame. Flatness rework can burn your margin.
Yes. Balanced sequences[^1], clamp placement, chill bars, and stitch patterns reduce pull. A smart fixture[^2] often saves more money than a new torch.
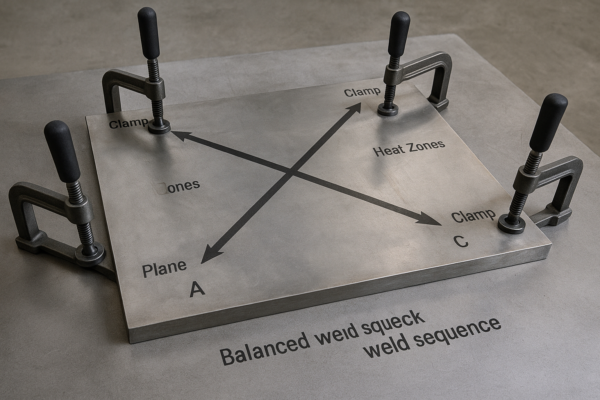
I build distortion control[^1] into the quote. I weld in a back-step pattern, balance opposite seams, add copper chills on long fillets, and pre-bow parts on repeat jobs so the pull lands them flat. If the RFQ needs tight flatness on a one-meter frame, I plan a stress-relief[^2], a straightening press, or a light post-machining pass on datum pads.TWI’s design notes also stress that changing joint prep from a wide V to a J can reduce weld volume and heat input, which helps both cost and flatness.
If you want to see fixture stories and before/after flatness maps, check our Case Studies.
RFQ Data Pack: What Should I Send to Get a Clean Quote?
A short email with a fuzzy PDF[^1] starts a long chain of guesses. Guessing makes late quotes[^2] and bad prices.
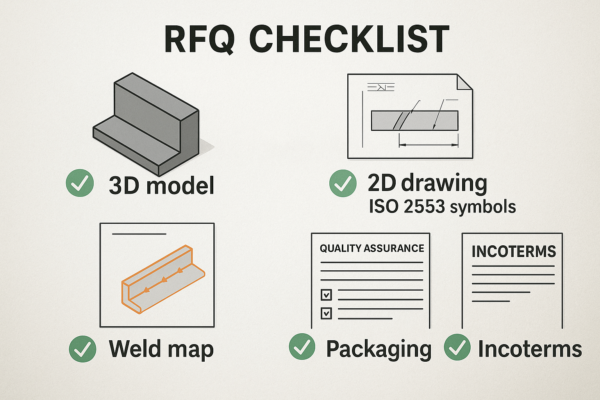
Send a data pack: 3D + 2D, weld map[^1], materials, finish class, QA level, volumes, packaging, and Incoterms[^2]. Add photos or a sample. Clear input cuts price and lead time.
I attach my own proof when I quote: weld-volume math, process choice, minutes, and adders. If code applies, I list the WPS/PQR and welder quals (AWS D1.1:2025[^1], ASME Section IX[^2]). I show a fixture sketch and a lead-time range by volume and OEE.This bundle builds trust and speeds approvals.
When you are ready, upload your files on Contact or start a chat from any product page (e.g., Stamping Parts, CNC Parts, Casting Parts).
Quick Cost Model: Can I Estimate Before Sending an RFQ?
Your boss wants a number before lunch. You still need a plan.
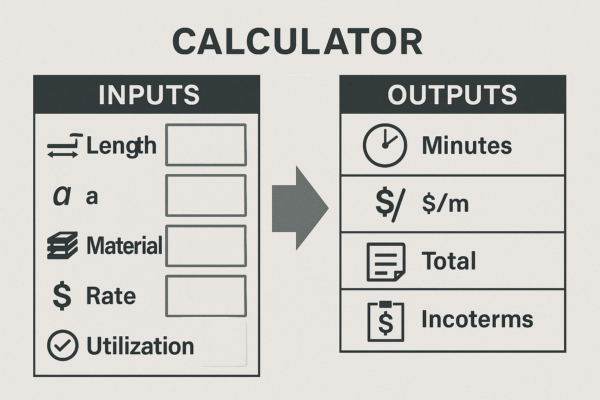
Yes. Use a simple model: compute fillet volume[^1] with 0.707×a², convert to mass, divide by deposition rate[^2] for arc minutes, divide by utilization for real minutes, then add prep, QA, and packaging.
In normal shop conditions, MIG/GMAW[^1] sits around ~1–8 kg/h depending on wire size/current; TIG sits ~1–2 kg/h. That gap explains most price differences for the same seam size. If material chemistry pushes preheat (watch Carbon Equivalent, CE[^2]), cycle time rises again.TWI’s notes on deposition bands and CE are good grounding when your team wants sources in the RFQ.
If you want me to sanity-check your math, drop the numbers in your message on Contact. I reply with my sheet and a firm plan.
Total Landed Cost: Do Incoterms, Logistics, and Payment Terms Change the “Best Price”?
A low unit price can hide a high landed cost. Freight and cash terms can erase savings.
Yes. Incoterms[^1] shift cost and risk. Packaging and route change damage rates. Payment terms change cash cost. I compare FOB, CIF, and DDP[^2] using real crate specs and transit plans.
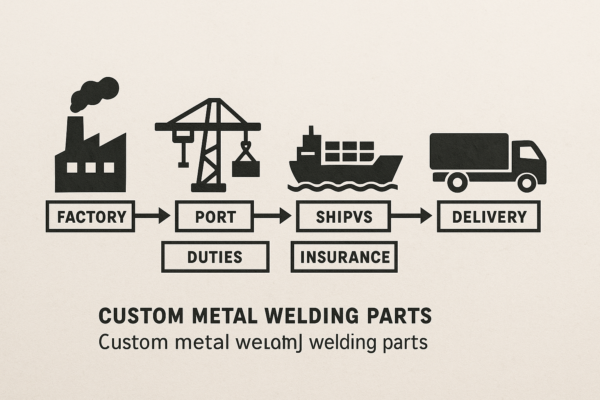
I measure pallet count, crate size, and weight. I pick ISPM-15[^1] wood, add VCI and desiccant, and brace heavy frames. For fragile finishes, I validate with ASTM D4169[^2] or ISTA 3A. These steps cost less than a claim. If cash exposure is high, I model terms and currency to show the real total.The “cheapest” quote often loses after freight, damage, and cash cost.
See how we combine these decisions in practice in our Blog posts on landed cost and pack design.
Supplier Vetting and Audits: How Do I Avoid Delays and Poor Quality?
A nice website is not a welding system. A shiny robot is not a process.
Audit the shop. Check ISO status[^1], WPS/PQR files, welder quals, fixture library, and NDT gear. Review OEE logs[^2]. Ask for a first-article plan and a rework log. Real systems leave real evidence.
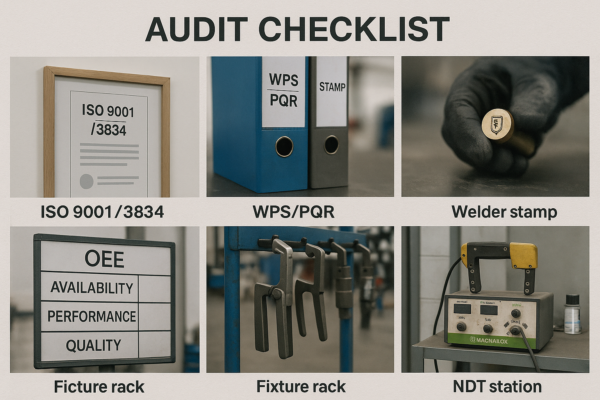
I open the WPS/PQR binder and compare it to the part. I look for current welder tests. I want to see modular fixtures[^1] and labeled locators, not a pile of clamps. I scan the OEE board near the robot cell. I ask for a traveler from a live job. I walk the grinding room and the crate shop. For symbol literacy and practical weld sizing, I often share TWI’s “Weld Symbols[^2]” note with buyers who want a quick study. It reduces rework and emails.
If you want our audit template, message us via Quality Control and we will send a copy.
Common Mistakes and Fast Fixes: Can I Save 10–20% Without Risk?
Teams often chase pennies in the wrong place. They cut wire grade and save a dollar. They lose ten dollars in minutes.
Yes. Standardize fillet sizes[^1], switch to intermittent where allowed, keep welds flat, improve fixtures[^2], and plan packaging. These steps cut time and claims without hurting strength or looks.

I see the same five leaks. Oversized fillets. Continuous seams where stitches would do. Vertical welding caused by lazy fixtures. No datum plan. Weak crates. TWI’s design notes show why oversizing adds volume sharply; trimming “a” to the real need is safe when engineering signs off. Write the acceptance level (e.g., ISO 5817) in the drawing, pick a few critical welds for NDT, and define flatness checks in the fixture. Then run a short pilot and lock the minutes.:contentReference[oaicite:11]{index=11}
For related savings beyond welding, see my stamping and forging playbooks: Reduce Stamping Cost and Cut Forging Total Cost.
Case Study: A Frame Assembly From Quote to Delivery?
Stories teach better than slides. This one changed how I quote.
We changed joint design[^1], standardized fillets, added a modular fixture[^2], and planned packaging. Cost fell 18%, lead time fell 22%, and complaints dropped to zero.
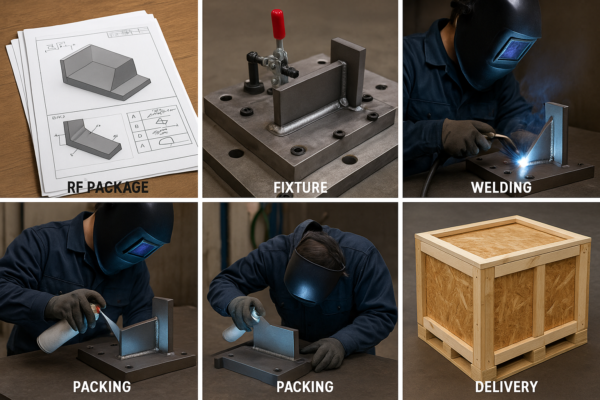
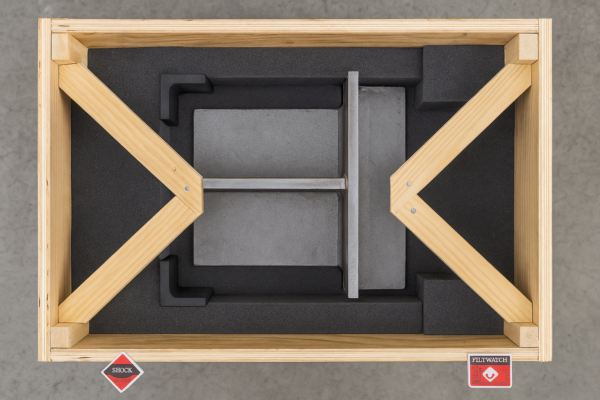
We started with continuous fillets and mixed sizes. We added a 3D file, a clean 2D, and a weld map. We set ISO 5817 Level C[^1] and VT for all seams, with PT on four joints. We standardized fillet sizes to a = 6 mm except at two brackets (a = 8 mm). We built a modular fixture with three datums and poka-yoke pins, rotated the frame to weld flat, and used MIG on hidden seams[^2] with TIG on visible covers. Minutes dropped from 22 to 17 per frame. Straightening vanished.
Export crates with ISPM-15 wood, foam, and shock/tilt labels prevented damage. You can see similar results in our Case Studies.
FAQs
Why does a smaller part sometimes cost more than a bigger part?
Weld volume, not part size, drives time. A small part with long fillets or large a can need more filler and minutes than a larger part with short stitches. TWI’s design notes explain why area rises with the square of size.
How do I estimate welding time fast?
Compute 0.707×a² × length for volume, convert to mass, divide by deposition rate for arc minutes, then divide by utilization. Add prep, QA, and packaging. If CE is high, plan preheat.
Does switching from TIG to MIG hurt quality?
Not if the joint, access, and finish allow it. MIG is faster; TIG is cleaner. I often use both: TIG on visible seams, MIG on hidden ones. See my mixed-process notes on Welding Parts.
When is a welding robot worth it?
When volume is stable and fixtures are strong. Below 150–200 pieces per run, modular jigs often win. Above that, a cell with honest OEE pays back fast.
How much should I budget for post-weld and packaging?
Plan 10–20% of total. Include grinding, blasting/passivation, NDT, flatness work, and export packaging validated by ASTM D4169 or ISTA 3A when needed.
Can I use intermittent welds without losing strength?
Sometimes, yes. If loads, fatigue, and sealing allow it, stitch welds with a clear pitch can save time and heat. Use ISO 2553 symbols and test to confirm.
What documents prove a supplier can meet code?
A valid WPS, a matching PQR, and current welder quals per AWS D1.1 or ASME Section IX, plus an NDT plan and calibration records.:contentReference[oaicite:16]{index=16}
What is arc utilization and why does it matter?
It is the share of time the arc is on. Hand work often sits near 25–35%. A stable robot can reach 60–70%. Utilization often changes real minutes more than wire price.
What should I include in the RFQ to avoid surprises?
Send 3D/2D files, a weld map, material grades, finish class, acceptance level, NDT plan, volumes, packaging details, Incoterms, and payment terms. Then ask us on Contact to assemble the cost proof.
Author & Credibility
I write as a factory owner who still walks the floor. I founded Prime in 1993 and run one-stop production across stamping, welding, casting, CNC, fasteners, and plastics. We hold ISO certification and keep weld quality stable with documented WPS/PQR, welder quals, and in-process checks aligned to ISO 3834 methods. On structural work we follow AWS D1.1:2025; for pressure parts with partners we use ASME Section IX. I also design export-grade packs validated with ASTM D4169/ISTA 3A. If you want to see how that system looks, start at About and Quality Control.
Conclusion
Price the weld, not the part. Use simple math, plan QA and packaging, align on public standards, and link your RFQ to real fixtures and minutes. Then the quote will match delivery.